

This personal guide is for first-time visitors who want to experience Zion National Park’s iconic hikes; Angels Landing, The Narrows, Observation Point, Emerald Pools, Canyon Overlook, and the Watchman Trail – guide-free.
With the right planning, gear, and a dash of courage, you can safely navigate these trails solo, just like I did. I had my doubts before going too. This article lays out what Zion is really like.
Let me share my story, tips, and encouragement to help you confidently hit the trails on your own terms.
Planning Your Self-Guided Zion Hike
Before diving into each trail, let’s cover a few logistics that empowered me to hike independently:
Zion’s Shuttle System
Zion Canyon’s main trailheads are accessed by a free shuttle bus (no reservation needed). From early spring through late fall, you cannot drive your own car up the Zion Canyon Scenic Drive during the day.
I found the shuttles incredibly convenient – they run every 5–10 minutes in peak season, stopping at all major trailheads (e.g. Stop #6 for Angels Landing, Stop #9 for The Narrows). Grab a park shuttle timetable (or download the NPS app) so you know the first/last shuttle times.
Catch an early shuttle in the morning to beat crowds, and never rely on the last shuttle of the day – if it’s full or you miss it, you could be facing a nine-mile walk back in the dark! During winter (approximately December–February) when shuttles are off-duty, the scenic drive opens to private cars.
I once drove to the trailheads in January – just remember to park only in designated spots (the Grotto lot is small) and avoid roadside parking if full, as the park strictly enforces rules.
Permits & Reservations
One big difference hiking solo is you are responsible for securing any required permits. The main one in Zion is for Angels Landing – everyone who hikes the chained ridge section beyond Scout Lookout needs an advance permit.
Zion runs a lottery system: a seasonal lottery (applied months ahead) or a last-minute lottery one day before. I budgeted $6 for the lottery application (covers up to 6 people) and was lucky to snag a permit to visit Zion national park on October.
If you win, there’s an additional $3 per person fee – be sure to print or download your permit email before the hike, since cell service in the canyon is unreliable.
No permit? Don’t fret – you can still hike up to Scout Lookout without one, enjoying much of the Angels Landing trail and its views. For The Narrows, a permit is not needed for the popular bottom-up day hike from the Temple of Sinawava as far as Big Spring.
I didn’t need any paperwork to wade upstream and back down. (Permits are required only if you attempt the full top-down 16-mile Narrows through-hike from Chamberlain’s Ranch, which is a more advanced adventure.) None of Zion’s other famous day hikes require permits.
Just pay the park entrance fee ($35 per vehicle for a week, or $20 per person walking in) and you’re good to go.
Gear Up (What to Pack or Rent)
Hiking without a guide means you need to come prepared with the right gear. Zion’s trails range from paved paths to water-filled canyons and steep rock scrambles, so pack accordingly. Here’s what I found essential:
- Footwear: Sturdy hiking shoes or boots with good traction are a must for Angels Landing, Observation Point, Watchman, etc. For The Narrows, rent canyon shoes, neoprene socks, and a wooden walking stick from an outfitter in Springdale – it cost me about $30–$40 for the whole package, and it was worth every penny. The special water gear kept my feet warm and protected on slippery river rocks (normal hiking boots will get soaked and can be ruined). In colder months (late fall through spring), consider renting dry pants or a dry suit if you plan to hike The Narrows, as water temperatures can be frigid.
- Clothing: Zion’s weather can swing from blazing hot to chilly. In summer, I wore moisture-wicking shirts, shorts, a wide-brimmed hat, and plenty of sunscreen. In the Narrows, even on a 100°F day, the water in the slot canyon felt cold, so I brought a light fleece to stay warm when wading chest-deep. If you hike in winter, dress in layers and pack a lightweight jacket – Zion’s winter days range from about 30°F to 60°F. I also learned the hard way that gloves are smart for Angels Landing in winter; those metal chains get icy cold (and sometimes icy, period).
- Navigation & Trail Info: Even solo, I never felt “lost” on Zion’s popular trails – they’re generally well-marked with signs at junctions and obvious paths. Still, I carried the free Zion park map (grab one at the Visitor Center or download the official NPS brochure PDF) and I had offline maps on my phone via the NPS app. Each trailhead has an information sign with a map, distance, and elevation info. Before heading out, I also checked the park’s Current Conditions webpage for any trail closures or alerts (for example, Observation Point’s main trail has been closed long-term due to a rockfall). The trailhead signs and maps were my guides – I took a photo of each with my phone, a handy reference if needed on the hike.
- Hydration and Snacks: Zion is desert country; I quickly realized staying hydrated was my responsibility. I packed a refillable water bladder (~3 liters) for longer hikes like Angels Landing and Observation Point, and about 1–2 liters for shorter ones like Emerald Pools. Water filling stations are available at shuttle stops like the Visitor Center, The Grotto, and Zion Lodge, so top off whenever you can. The park rangers advise “drink plenty of water” and they’re not kidding. For energy, I brought trail mix, energy bars, and fruit. Important: Always secure your food when you set your bag down – Zion’s squirrels are shockingly bold! I once left my pack open for a minute and a squirrel nearly stole my sandwich. Never feed wildlife (for their safety and yours) and store food securely to avoid attracting critters.
- Safety Basics: In addition to the above, I carried a small first aid kit, a headlamp (in case I took longer than expected and finished near dark), and a portable battery for my phone. Trekking poles helped on longer uphill hikes (except where they weren’t practical, like the Narrows where I used the wooden stick, or Angels Landing’s chains section where poles would just get in the way). If hiking in winter or early spring, ask a ranger about trail conditions – icy trails like Angels Landing or Emerald Pools may require traction devices (microspikes) which you can bring or even rent in town. When hiking solo, I made it a point to tell someone (a friend or even a note in my car) about my plans and expected return time, just as a precaution.
With these preparations in place, I felt set up for success. Now, come along as I recount tackling Zion’s famous trails without a guide, sharing the best seasons to hike, what to expect, and personal tips I picked up along the way.
Angels Landing
Trail Overview
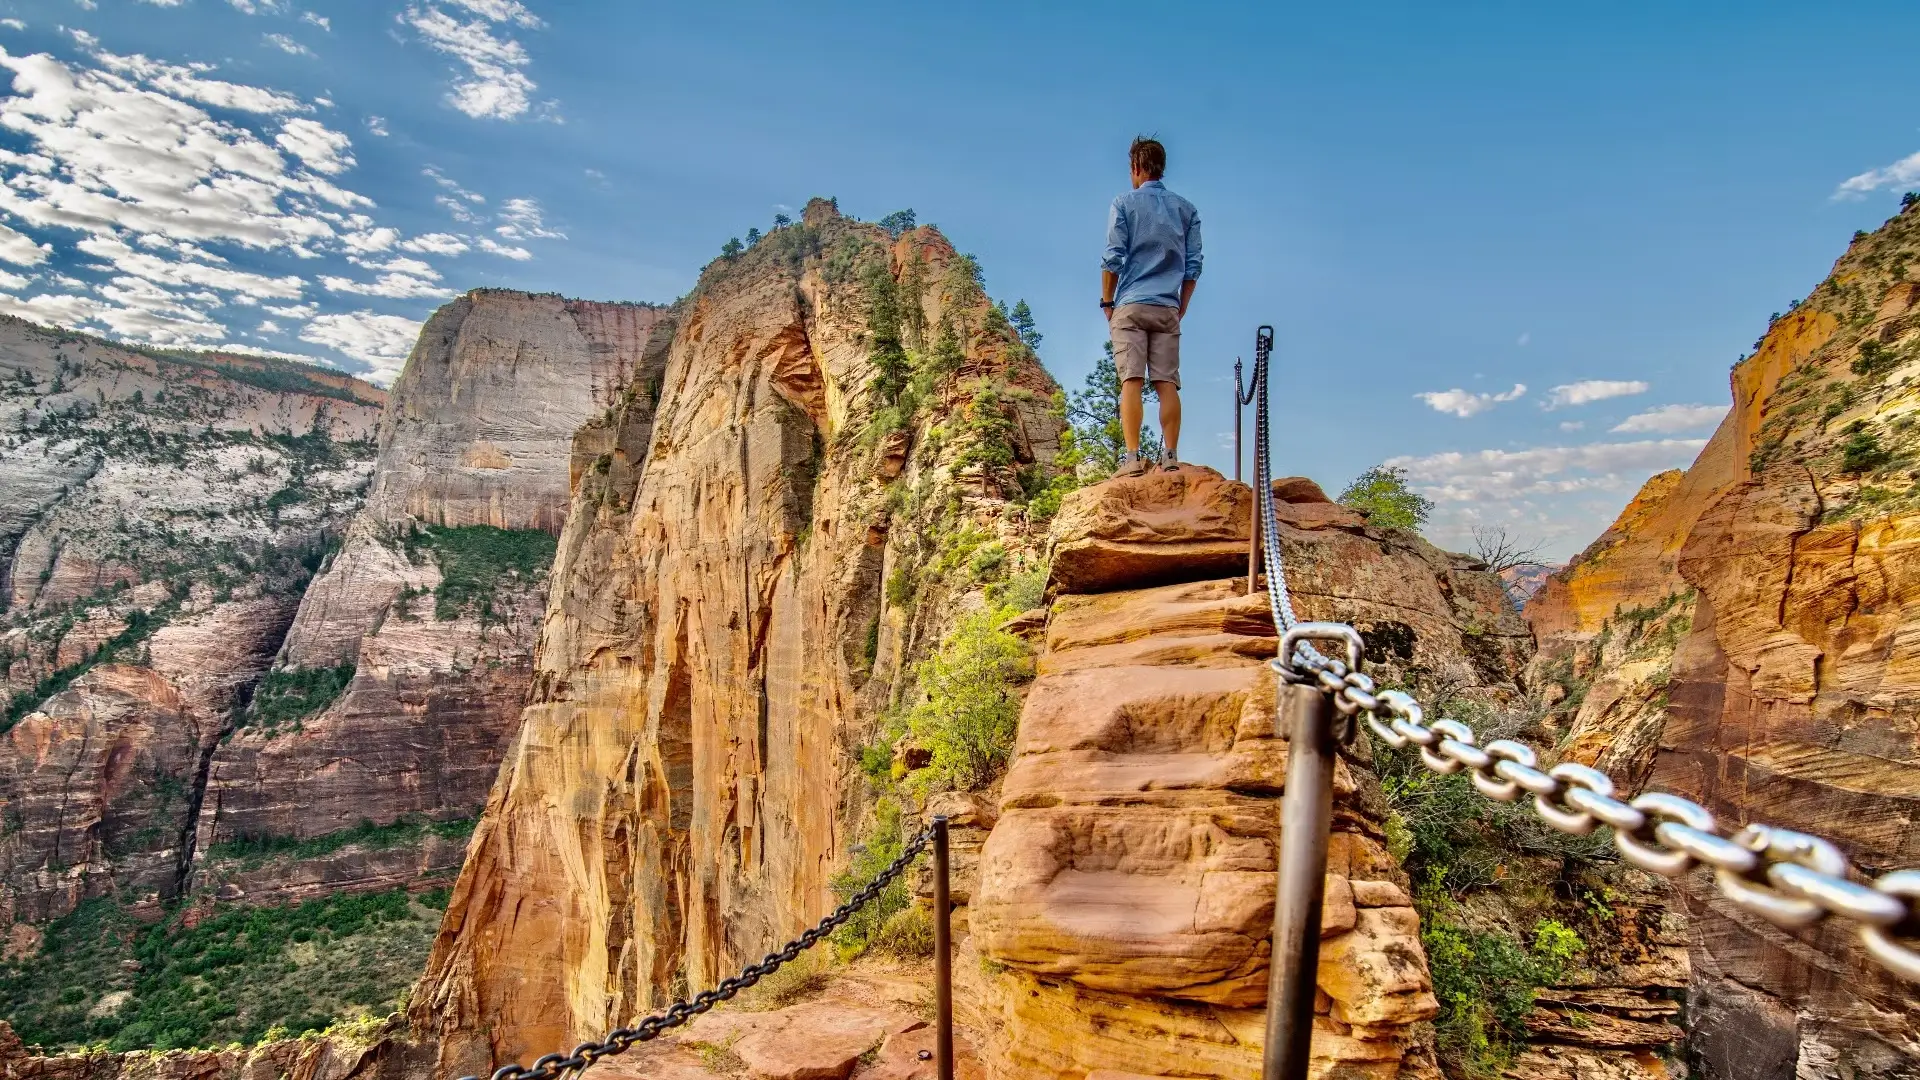
Angels Landing is the iconic Zion hike, famous for its final half-mile of rock ridge with chains to hold onto. It’s a strenuous 5.4-mile round trip with ~1,500 feet elevation gain.
The reward is a jaw-dropping 360° view of Zion Canyon from the summit. This trail is not for those with severe fear of heights or balance issues – but you don’t need a guide if you prepare and know your limits.
I tackled Angels Landing on my second day in Zion, permit in hand and butterflies in stomach. I hopped off the shuttle at The Grotto (Stop #6) around 7 AM, the autumn sun just peeking over the canyon walls.
The first two miles up West Rim Trail were steep but straightforward – a well-maintained path and a series of switchbacks called Walter’s Wiggles. Hiking solo, I could go at my own pace. I took breaks when I needed, letting faster hikers pass (trail etiquette 101), and drank water in the shade of cliffs.
By the time I reached Scout Lookout, I was feeling the burn in my legs but also gaining confidence. Scout Lookout is a broad saddle where those without permits (or with a fear of heights) often stop – and it has a splendid view down Zion Canyon, no chains required. After a short rest, I showed my permit to a ranger and started the infamous last section.
The chains section is as thrilling as people say. Immediately, the trail narrows and you’re gripping chunky metal chains bolted into the rock for support. Was I scared? Honestly, a little – but mostly I was focused. Being on my own meant I could pause whenever my nerves fluttered.
I let a large guided group go ahead and then had a stretch of trail to myself, which I loved. I made sure to always have a firm grip or stable footing before moving.
There are a few spots only wide enough for one person, so communication and patience are key – I’d call out “coming up” or “mind if I pass?” to hikers coming the other way, and we took turns safely.
The fact that I wasn’t with a guide didn’t matter; everyone on the trail sort of looked out for each other in those tight spots.
After about 30 minutes on the ridge, I arrived at Angels Landing summit (5,790 ft). Standing there alone (well, alone among other hikers), I felt an incredible sense of accomplishment.
I soaked in the view: the green ribbon of the Virgin River 1,500 feet below, the Great White Throne rock formation across the canyon, tiny shuttles on the road beneath.
I even spotted a California condor circling below – a rare endangered bird that sometimes hangs out near Angels Landing. In that moment, any earlier fear melted into pure joy. I’d done it without a guide, on my own terms and timing.
Best Time to Hike Angels Landing
When should you go? In my experience, spring and fall are ideal. My October hike had perfect weather – cool in the morning, not too hot by midday, and far fewer people than the summer crush.
Spring (late March through May) offers comfortable temps and pretty greenery, though watch for any late snow or rain which can make the trail slick. Summer is the most popular but comes with challenges: daily highs often above 100°F in Zion Canyon, very large crowds, and the risk of afternoon thunderstorms especially in July–August (lightning + high exposed ridges = no good).
If you hike in summer, start at dawn to beat the heat and congestion. The trail is much more enjoyable when it’s not a conga line on the chains. Winter is quiet and beautiful up there, but you may encounter ice or snow on the trail.
The park doesn’t close Angels Landing in winter, but if there’s ice, the chained sections can be extremely dangerous.
If you attempt it in winter, bring traction devices and use extreme caution. The NPS specifically notes that in winter the chains themselves get very cold, so gloves are helpful (cold metal can numb your grip).
I’ve done Scout Lookout in December and found patches of ice in shaded switchbacks, so it’s good to check with rangers about trail conditions before you go in off-season.
Safety and Tips for Angels Landing
Here’s how I managed this hike solo:
- Permit Prep: As mentioned, secure your permit in advance through the lottery. If you don’t get one, consider hiking to Scout Lookout instead – you’ll still get a great view and a taste of the trail.
- Start Early: I began at sunrise and highly recommend it. Early hikers enjoy cooler temperatures and lighter crowds. By mid-morning, the trail can get jam-packed, especially at bottlenecks where only one person can go at a time.
- Go At Your Pace: There’s no prize for rushing. I took my time on the chains, always keeping three points of contact (two feet and one hand, or vice versa). If someone behind me was faster, I found a safe spot to let them pass. Likewise, I appreciated when others gave me room to navigate a tricky spot. This cooperation is usually natural among hikers there.
- Weather Watch: Absolutely avoid this hike if storms are in the forecast. Rain makes the rock slick, and wind on that ridge can be scary. One afternoon a sudden rain shower came through and a ranger actually closed the chains temporarily until it passed. I was glad I had gone up earlier. In summer, watch out for thunderstorm alerts – Zion can get sudden downpours in monsoon season (July/August) which not only risk flash floods elsewhere, but also lightning risk on exposed peaks. If the forecast looks stormy, choose a different trail that day.
- Know Your Limits: I won’t sugarcoat it – Angels Landing feels hazardous if you’re not used to heights. There have been accidents here. Going without a guide, I had to be extra honest with myself. At one point, I encountered a woman coming down in tears, feeling she couldn’t go on. I gave her a friendly word and we scooted carefully past each other. It’s okay to turn around if you get uncomfortable. The trail will be there another time. As a solo hiker, your safety is in your hands, so there’s zero shame in stopping at Scout Lookout and enjoying the view from there if that’s what your gut tells you.
- Enjoy the Summit: If you summit, spend some time up there! I signed the little unofficial log book hidden in an ammo box, ate a snack, and chatted with fellow hikers. Those shared moments with strangers (who became friends for a day) are part of the joy of unguided hiking – we were all just people who love nature, celebrating together on an Angel’s perch.
Coming down, I actually found descending the chains easier than going up, perhaps because I knew what to expect. Back at The Grotto, I gave a whoop of triumph (maybe only the canyon walls heard me).
Hiking Angels Landing without a guide taught me that preparation and confidence can carry you a long way. And trust me, if I can do it, you can too – just plan well and respect the trail’s risks and fellow hikers.
The Narrows
If Angels Landing tested my head for heights, The Narrows tested my sense of adventure.
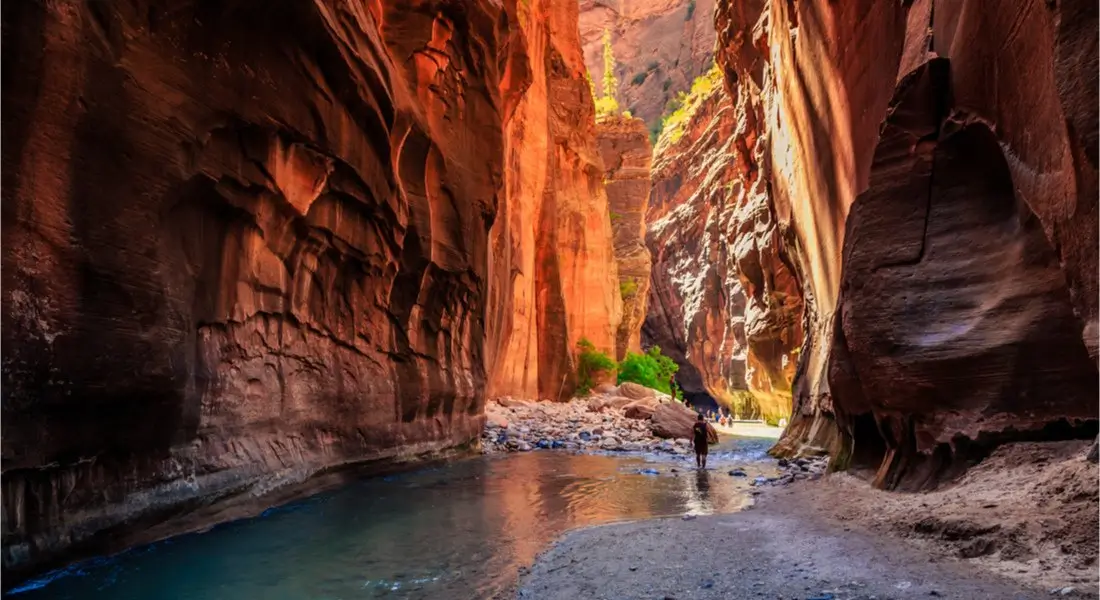
Hiking The Narrows means trekking in the Virgin River itself, through the narrowest section of Zion Canyon with water flowing around your ankles, knees, and sometimes waist or chest.
It’s not your typical trail – there’s no dry path for much of it, just the river coursing between thousand-foot-high sandstone walls. And yes, you can absolutely do it without a guide (I did, and it remains one of my favorite hiking memories ever).
Trail Overview
The most common Narrows trip is a bottom-up day hike starting at the Temple of Sinawava (the final shuttle stop, #9). You walk one mile on the paved Riverside Walk, then where the pavement ends, the Narrows begin – you’ll be in the river from that point onward.
You can turn around whenever you like; many people make Big Spring (around 4.5 miles upriver from the start, ~9 miles round-trip) their goal, since going beyond that point requires a permit and overnight gear. Bottom-up hikers do not need any permit, which makes spontaneous decisions possible – I actually decided on a whim to do the Narrows on my last day.
The difficulty is moderate to strenuous depending on how far you go; hiking in water against current can be slow. Plan on a full day if aiming for Big Spring (8–10 hours). There’s also a top-down 16-mile version starting outside the park (Chamberlain’s Ranch) which is permit-only and usually done with a guide or as an overnight – not something I’d recommend for first-timers. I stuck to the classic bottom-up route, which showcases the best parts anyway.
I set out for The Narrows on a warm July morning, which is prime time for this hike. Stepping off the shuttle at Temple of Sinawava, I was brimming with excitement (and admittedly a bit of nerves about the water).
I had rented canyoneering shoes, neoprene socks, and a sturdy wooden walking stick from an outfitter the evening before, as mentioned in the planning section. Best decision ever.
The special shoes and sock combo gave me grip and kept my feet comfortable even as the river flowed at a brisk pace around them. Several other hikers in sneakers were already complaining of cold, sore feet – not a fate you want.
The first section along Riverside Walk was a breeze – a flat stroll with the river gurgling next to the paved path. At the end of the pavement, I laughed as everyone paused to either change into water shoes or just plunge in.
I tightened my day pack (water can tug at it) and stepped into the Virgin River. Yikes! The water was shockingly cold at first (it was morning, and the canyon hadn’t seen sun yet), but my legs adjusted in a few minutes.
Right away, I realized why the wooden stick is a lifesaver: you use it to probe depth and brace yourself against the current. The riverbed is uneven and slippery with rocks – I was glad for the extra “third leg” of stability.
As I waded upstream, the brown canyon walls closed in, and soon I was in the famous Wall Street section – at times only 20–30 feet wide, with sheer cliffs hundreds of feet high. It felt like a fantasy world, with diffused light high above and the sound of water echoing.
Being guide-free, I could choose my own adventure: sometimes I stuck with a friendly group of hikers for a while, chatting and helping each other pick routes through deeper pools; other times I paused alone in a shallow spot, turned off my headlamp (the inner Narrows can be dim), and just listened to the quiet drip of water. I kept looking up in awe at the sculpted walls. This was why I came to Zion.
Safety Note
Before entering The Narrows, I had checked the weather and the park’s morning flash flood forecast. This is critical. The Narrows can be deadly if a flash flood hits – there’s nowhere to go in the slot canyon if the water suddenly rises.
Zion posts a flash flood risk rating at the Visitor Center and on their website daily (Low, Moderate, High). I only went in with a “Low” risk day and clear blue skies.
In summer, thunderstorms are the big worry – they can dump rain miles upstream that turns the Virgin River into a torrent in minutes. Outfitters advised me to be out of the Narrows by early afternoon in monsoon season (July–Aug) as a precaution.
I heeded that advice. As I hiked the trails, I also stayed aware: if I noticed sudden muddy water or increasing debris, that could mean a flood coming. Thankfully, my day remained sunny and the water flow steady (the Park will close the Narrows if the river exceeds 150 cubic feet per second or if storms are imminent – always respect those closures).
I made it as far as the side canyon entrance of Orderville Canyon, about 2.5 miles in, when the morning sun finally crept into parts of the Narrows, illuminating the walls in golden light.
Many consider Orderville (which comes in on the right looking upstream) a good turnaround for a shorter Narrows hike. I pushed on a bit further into Wall Street, encountering some waist-deep pools that gave me a refreshing mid-hike “dip.”
There were definitely sections where I had to swim briefly – I waterproofed my gear in dry bags just in case, and it paid off. The deepest spot I hit was chest-high (I’m 5'7") and it only lasted a few yards. Each time, I made sure to keep that hiking stick planted firmly and move slowly – one careful step at a time on those bowling-ball sized river stones.
After around 4 hours of exploring upstream, I found a sunny rock and ate my lunch, shoes draped on a boulder to dry a bit. The experience was magical: cool water, warm sun on the cliffs, a gentle breeze, and silence punctuated by the occasional laughter of other hikers echoing from around a bend. Without a guide, I felt truly immersed in the moment – no schedule but my own.
The hike back downstream was quicker (going with the flow). I was pleasantly tired but not exhausted, thanks to pacing myself and snacking regularly. I emerged from the river in the mid-afternoon, fulfilling the goal of being out before any hint of late-day storms.
My legs were a bit wobbly on solid ground (water hiking uses a lot of stabilizer muscles!), but I was elated. I had just trekked through one of the world’s greatest slot canyons on my own.
Best Time to Hike The Narrows
Timing is everything for The Narrows, due to water levels and temperature:
- Summer to Early Fall (July–September) is prime. The water level is usually lowest and warmest. By July, snowmelt has subsided and flows are manageable (often under 50–70 CFS, which makes for moderately difficult but not prohibitive wading). Late summer also means risk of flash floods due to monsoons – typically afternoon thunderstorms in July/August. So, summer Narrows hiking is a balancing act: go when it’s hot (the canyon stays cooler than outside temperature), but start early to avoid potential afternoon storms. I personally love September: still warm but monsoon season is tapering off, and the crowds thin out after Labor Day.
- Autumn (October) can also be fantastic. Cooler air, fewer people, and often stable weather through mid-fall. The water will be chilly, but with proper gear (maybe dry pants in late fall) it’s fine. Days are shorter, so start earlier to have enough daylight.
- Spring (April–May) is iffy. Spring snowmelt from the mountains can raise the Virgin River to unsafe levels (over 150 CFS, at which point the Park closes the Narrows). In fact, The Narrows is often closed for weeks in spring – looking at past data, there are years where April and even May were a no-go for bottom-up hikers. If you’re visiting in spring, check the Current Conditions report; it will say if the Narrows is open or closed. If open, the water will be very cold (probably requiring dry suits) and still running high. Only attempt it if you have appropriate gear and experience with cold-water hiking.
- Winter (Nov–March): In winter, The Narrows is a serene, uncrowded experience if you can handle the conditions. Daytime highs in the canyon might be only 40°F, and the water even colder. You’ll need a full dry suit and insulating layers (these can be rented; dry suit packages start around $79 for a day). The flow is usually low in winter, but sometimes early spring melt or rain can close it. One big plus in winter: no crowds at all – you might have stretches of the canyon to yourself. I haven’t done a deep winter Narrows trek yet, but it’s on my list. Just be aware of shorter daylight and the real risk of hypothermia if you’re not equipped right. Many services in Springdale also run on limited hours in winter, but you can still rent gear.
Tips for a Safe, Fun Narrows Hike
Gear Up for the Water: I can’t stress enough – rent the proper Narrows gear unless you have your own. The canyoneering boots, neoprene socks, and walking stick will make your experience so much better.
They provide warmth and ankle support and help prevent injuries. Numerous outfitters in Springdale open early (some at 6 or 7 AM) for hikers to pick up gear.
I reserved mine the day before to be safe. If it’s cold, spring for the dry pants or suit; if it’s summer, the basic package is fine (you’ll welcome the cool water on a hot day).
Check Conditions and Forecast: Always look at the park’s “Alerts” or talk to a ranger about the day’s flash flood potential and current water flow. Zion NPS even provides a link to a USGS gauge so you know the CFS (cubic feet per second) of the river in real time.
Generally, below 50 CFS is very manageable, 50–70 CFS is moderate, and above 100 CFS starts getting difficult. At 150 CFS, it’s closed to hikers. Also, never enter if there’s a flash flood warning in effect – that’s just asking for trouble.
Hike Early (Especially in Summer): Morning light in the Narrows is magical, and you greatly reduce your risk of getting caught in an afternoon thunderstorm. Plus, you’ll find it less crowded early on.
By midday in peak season, a human conga line can form in some narrower parts, which takes away some of the peace. I started around 8 AM and had long stretches with only a few people around.
Plan Your Turnaround Time: There’s no one destination in the Narrows unless you aim for Big Spring. Many people turn around at Orderville Canyon (2 miles in) or Floating Rock (3 miles) or just whenever their feet say “enough.” I set a turnaround time rather than distance – I told myself I’d turn back by 1 PM to be safe.
It’s important to give yourself enough time to get out; walking against the current on the way in means a bit faster going back, but you’ll likely be tired. Keep track of time and progress.
Mind the Water Quality: Zion has had issues with toxic cyanobacteria in the Virgin River in recent years (a harmful algae bloom). There are sometimes advisories not to submerge your head or drink the water.
I didn’t filter any drinking water from the river (I carried all I needed), and I avoided swallowing any (not hard to do). Check the park’s alerts for any cyanobacteria warnings.
Also, obviously, don’t pollute the river – use restrooms at the trailhead (there are none in the canyon!), and pack out everything you carry in.
Enjoy the Unique Environment: Hiking in water is slow and can be tiring, but it’s also super fun. Embrace the experience – laugh when you stumble (everyone does), help someone who’s struggling to balance, and take time to appreciate the small wonders: hanging gardens of ferns on the walls, the way light dances on the water, maybe even the sight of a flash flood’s aftermath (logjams high above from past floods, reminding you of nature’s power).
Going without a guide, I felt a greater connection to the place – it was just me and the canyon. I also made impromptu friends with other solo hikers; we’d leapfrog each other, exchange tips (“Go left here, it’s shallower!”) and take each other’s photos. It’s a friendly vibe.
Emerging from The Narrows, I felt rejuvenated – and yes, ready for a hot shower and a big meal. I returned my gear and celebrated with an ice cream in Springdale while regaling fellow travelers with the day’s adventures.
Hiking the Narrows alone was empowering; it taught me that with vigilance and respect for nature’s rules, I could safely explore places that at first seemed daunting.
I hope you’ll feel the same magic when you stride into that river and look up at those slim passages that have been carved over eons, knowing you’ve stepped into another world and you made it happen on your own.
Observation Point
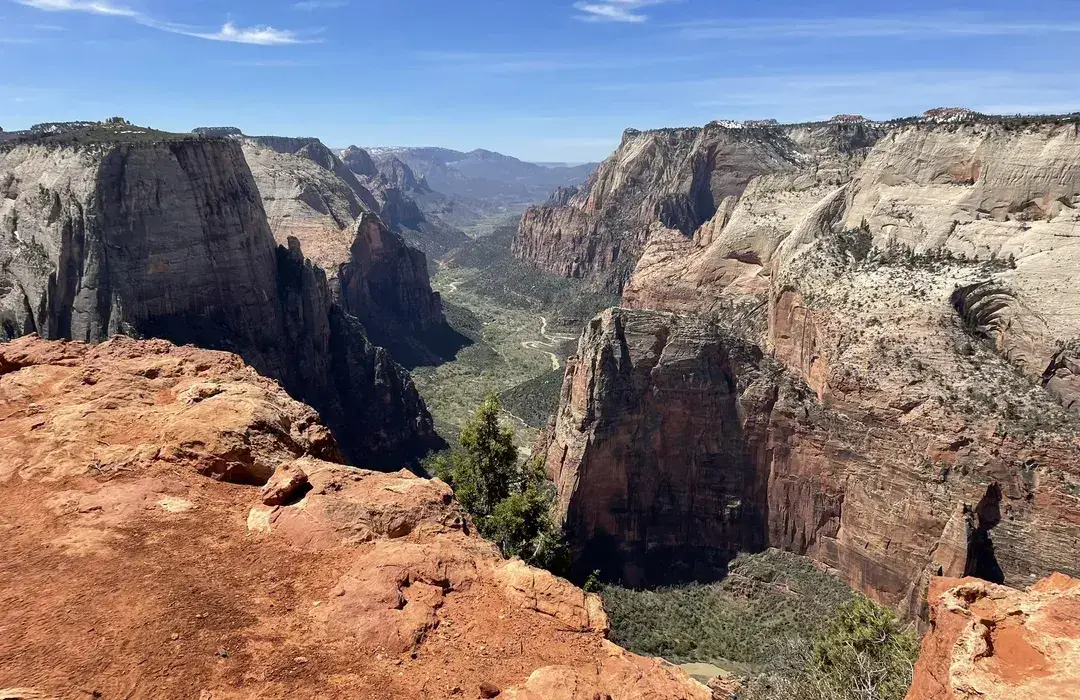
Observation Point holds a legendary status in Zion. At about 6,521 feet elevation, it stands even higher than Angels Landing, offering a spectacular eagle-eye view of the entire Zion Canyon.
It was actually my favorite viewpoint in the park – staring down at the tiny ribbon of the Virgin River and across at the towering West Temple and other peaks is an experience hard to put into words.
And the best part? I got there without a guide, and nearly had the place to myself.
Trail Overview
Now, a caveat – the traditional Observation Point Trail (via the East Rim Trail from the Weeping Rock shuttle stop) has been closed indefinitely due to a massive rockfall a few years ago.
This was the famous route with insane switchbacks through Echo Canyon. As of my trip, that route was still shut. But Zion always has alternative paths: to reach Observation Point, I took the East Mesa Trail from outside the park.
This is a lesser-known approach that starts on Zion’s east plateau and is actually a shorter, easier hike: about 6.5 miles round-trip with 600 feet of elevation gain. Compare that to the original 8-mile round-trip with 2,100 feet gain from the canyon floor – East Mesa is a gentle walk by comparison.
The trailhead is reached via a dirt road near Zion Ponderosa Ranch Resort (a private property area). Since I didn’t have a guide or shuttle service, I ended up driving a high-clearance rental car to the trailhead. (If you have a normal car, you might park earlier and add a mile or two of walking, or pay for a shuttle ride from the resort.)
I embarked on the Observation Point hike on a crisp April morning. The drive out to East Mesa Trailhead itself felt like an adventure – winding up onto the plateau through ponderosa pines and open meadows.
At the trailhead, only two other cars were there. I started down the East Mesa Trail, which is basically a flat dirt path through scrubby forest. No steep drop-offs, no crowds, just the sound of birds and my footsteps. Honestly, it was a peaceful change from the hustle of Zion Canyon below.
About 2.5 miles in, the trail met the old Observation Point Trail for the final approach. As I neared the rim, I felt the air get breezier and my excitement building. Suddenly, the trees parted and I stepped out onto the Observation Point promontory. Wow.
I had seen photos, but nothing compares to witnessing it firsthand. The entire Zion Canyon was spread out nearly a half mile below me. Directly below, I could see the tiny spine of Angels Landing and even pinpoint the chain route – it looked so small! I could see the Big Bend of the river, the switchbacks of the road, and across the way, familiar cliffs now at eye-level or below.
The sun was up but there was still a morning hush. And get this: I had it completely to myself for a good 20 minutes. Eventually a couple who had hiked behind me arrived, and we exchanged photographer duties to capture the obligatory “standing on top of the world” shots.
I sat on a rock ledge, legs dangling (carefully), and journaled a bit. This was a reflective moment for me – conquering Observation Point solo, via an unconventional route, felt symbolic. The closure of the main trail might deter many, but I was proud I did the research and found another way.
That’s something to note: a guide would have certainly taken me the East Mesa way if I’d hired one, but by doing it myself I learned so much about the area’s geography and got to experience solitude that a tour might not afford.
After basking in the views and eating a snack (with a raven eyeing me hopefully – sorry bud, no crumbs for you, I follow Leave No Trace!), I headed back the way I came. The return hike was quick and uneventful, and I was back to my car by early afternoon.
Best Time to Hike Observation Point
Since the East Mesa Trail is at higher elevation (starting around 5,200 ft and ending at 6,500+ ft), it’s a bit cooler than the main canyon. I found spring and fall to be ideal – my April hike was cool and pleasant. Fall would offer lovely colors in the canyon below.
Summer is fine too; the trail has some shade and isn’t too steep, but it can still get hot around midday. I’d aim for a morning start in summer.
Winter could be tricky up there: the dirt road to the trailhead might be impassable with snow or mud, and the rim can have snow/ice. But if conditions allow and you’re prepared for cold, a winter Observation Point under a dusting of snow would be magical.
Always check if East Mesa road is open (the park might not have official info on it since it’s outside their jurisdiction, but local forums or the resort could help). Also note, if you’re doing East Mesa, no shuttle is involved, so you either need your own vehicle or to arrange a ride.
Tips for Observation Point
- Navigation: The East Mesa Trail isn’t as well signposted as the front-country trails. I downloaded a GPS track beforehand (AllTrails etc.) to ensure I found the junctions. There are a couple of intersecting paths (to Cable Mountain, Deertrap Mountain, etc.). The main route was fairly obvious, but having a map gave me peace of mind.
- Road Access: The dirt road to the trailhead (often called “East Mesa Trailhead” or “Zion Ponderosa trailhead”) can be rough. When I went, it was dry and bumpy, but if wet it could require 4WD. If in doubt, you can park near the resort and walk an extra bit. I saw one low-clearance sedan up there, so it’s possible, but check recent conditions.
- Enjoy the Solitude: This route is much quieter. I encountered just two other parties. Enjoy that! But also, be prepared – you might not see others for stretches, so carry the ten essentials and be self-sufficient. Let someone know you’re hiking there since it’s a bit off the main tourist path.
- Alternate Plan if Closed: If for some reason you can’t do Observation Point (say the road is closed or you didn’t know about East Mesa in time), a great alternative view is Canyon Overlook (see below) or even Zion’s West Rim Trail (from where Angels Landing splits off, you can continue another mile or two for awesome high views without needing a permit). I actually did a portion of the West Rim after Angels Landing and found breathtaking vistas with far fewer people – something to consider if Observation Point is inaccessible.
Observation Point was a highlight for me. It proved that going guide-free can sometimes lead you to discover lesser-known routes that are just as rewarding. Standing up there alone, I felt like I truly earned that view.
It’s the kind of empowering experience that stays with you, and it’s available to any hiker willing to do a bit of extra planning to get there.
Emerald Pools
After some of the heart-pounding adventures, Emerald Pools provided a gentle, scenic respite – and a great confidence boost for hiking solo.
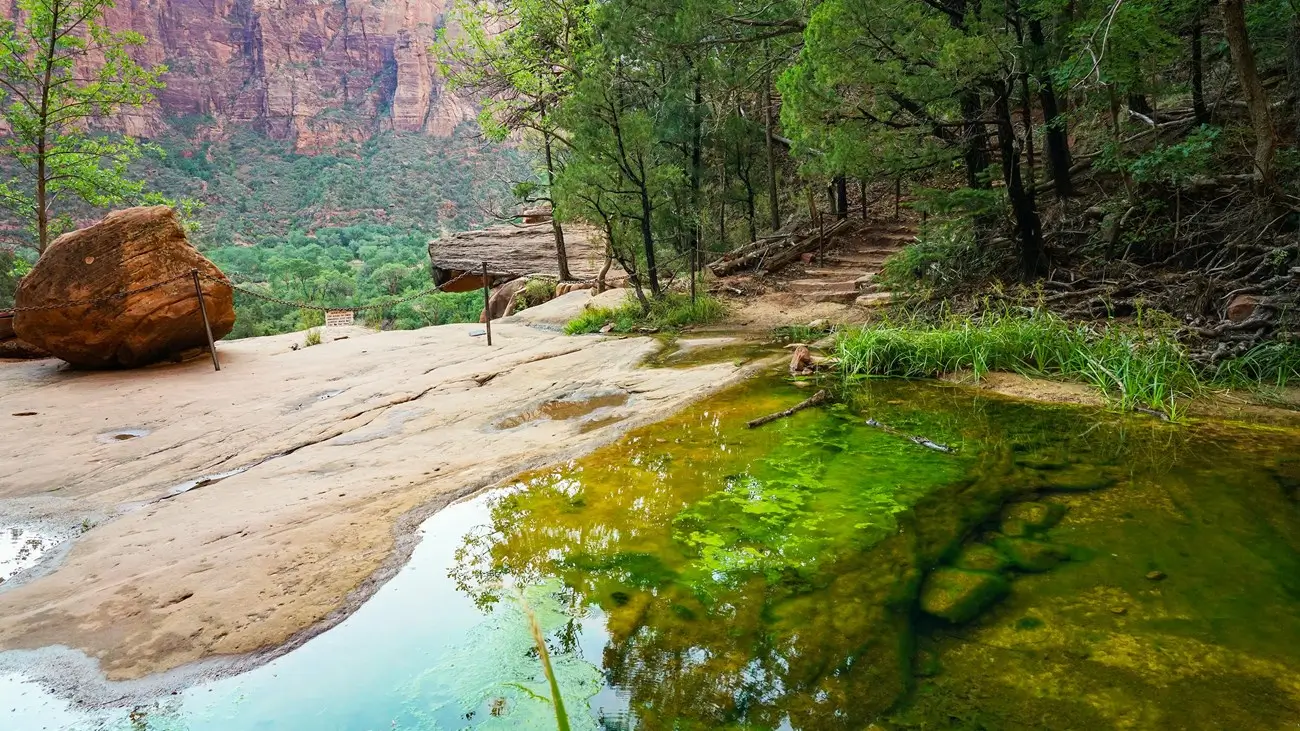
The Emerald Pools are a series of three pools (Lower, Middle, Upper) connected by well-marked trails near the Zion Lodge. This is a classic Zion hike that’s short and relatively easy, making it perfect for a first afternoon or a recovery day.
Trail Overview
You can tailor the Emerald Pools hike to your desired length and difficulty:
- Lower Emerald Pool Trail: ~1.2 miles round-trip from Zion Lodge, mostly flat and paved. Leads to a pretty alcove with waterfalls that drape over the cliff (in spring they’re significant; in late summer they can be a trickle).
- Middle Emerald Pool Trail: ~2.2 miles round-trip, starting either from the Lodge or from The Grotto via the Kayenta Trail. This path climbs a bit and brings you to a ledge above the lower pool waterfalls, where the “middle” pools reside.
- Upper Emerald Pool Trail: ~0.5 miles one-way spur from the middle pools (roughly 2.5–3 miles total if doing upper and back). This part is a bit steeper and sandy, ending at a high amphitheater with the upper pool at the base of a towering cliff.
I chose to make a loop: starting at Zion Lodge (Shuttle Stop #5), crossing the road and Virgin River, and taking the Lower Emerald Pool Trail up to the lower pool, then continuing up to the Middle and Upper pools, and coming down via the Kayenta Trail to The Grotto (Stop #6), where I caught the shuttle back. This loop was around 3 miles and took me maybe 2 hours at a leisurely pace.
I began in the late afternoon, when the sun was casting golden light on the canyon walls. Hiking solo here was very comfortable – there were plenty of other visitors on the lower trail (including families with kids, etc.), and the path is straightforward.
I reached the Lower Emerald Pool quickly, which sits at the base of a rock alcove. Water cascades over the lip of the cliff above, creating a curtain of droplets you can walk behind.
I actually felt a refreshing mist as I passed under – welcome in the summer heat! The pool below was, indeed, emerald-green, reflecting the foliage.
From there, I headed up the steps to the Middle Emerald Pools. This section was a little more rugged (no pavement, some rocky steps) but still moderate.
At the middle pools, you stand on a ledge above the waterfalls of the lower pool – be cautious near the edge, but it’s fenced in spots. The pools themselves are shallow and can be a bit muddy, but the view out toward the canyon was beautiful. Many day hikers stop here.
Determined to see it all, I continued up the spur to Upper Emerald Pool. The trail got steeper and sandier, winding up through trees until it opened at a huge cliff face – the Mountain of the Sun loomed above, and at its base was the upper pool, a still pond of water fringed by big boulders.
The high cliff sometimes has a thin waterfall pouring down (more impressive in spring). I sat on a rock here and soaked in the serenity. Even with a few other people around, it felt quiet. Birds flitted about, and the cliff walls gave a nice sense of seclusion.
One thing I appreciated doing this hike unguided was the freedom to linger. I spent a while at Upper Pool watching the afternoon light play on the rock and listening to the breeze. On a guided timetable, I might have been rushed along.
When I was ready, I made my way down, taking the Kayenta Trail turn-off which leads across the hillside to The Grotto. Kayenta Trail was lovely in the waning light – it has some expansive views of the valley as it gradually descends. I encountered far fewer people on this stretch, which was a bonus.
By early evening, I was at The Grotto shuttle stop. And conveniently, there are water refill stations there, so I chugged some water and topped up my bottle (I didn’t need much for this short hike, maybe 1 liter).
Best Time to Hike Emerald Pools
Anytime! This is a year-round trail. Spring is fantastic because the waterfalls are fullest (from snowmelt and rain) and wildflowers add pops of color. I recall one April visit seeing columbines and shooting stars near the pools.
Summer is fine, though start early or go late to avoid midday heat – there’s partial shade but also exposed sections that get toasty. In summer, the waterfalls may dwindle, but the pools are still pretty (just more stagnant).
Fall brings gorgeous autumn colors – the cottonwood trees near the Lodge turn yellow, making for postcard photos with pools in foreground and red cliffs behind.
Winter can be chilly and occasionally icy on the upper trail, but often the lower trail remains accessible; sometimes you’ll see delicate ice curtains where waterfalls freeze. Just be cautious of any icy patches on stone steps if hiking in winter – and the upper trail might close if conditions are bad.
Tips for Emerald Pools Trail
- Crowd Navigation: This is one of Zion’s most popular short hikes because it’s easy and accessible. To have a more peaceful experience, try early morning or late afternoon. I went late day and by the time I was coming down, I had Middle and Upper pools almost to myself. Midday can be quite crowded at Lower Pool (and remember, do not swim or wade in the pools – it’s not allowed, both for safety and preservation).
- Loop It: I highly recommend making a loop using Kayenta Trail and The Grotto. It offers better views and variety. Start at Zion Lodge, end at The Grotto or vice versa. If you’re too tired to do upper pool, the lower and middle by themselves are still worth it.
- Weather Watch: If it’s been raining a lot, check trail conditions – occasionally the upper trail can be closed due to rockfalls or slippery conditions. In stormy weather, do be careful as the rocks can get slick.
- Enjoy the Lushness: Emerald Pools is an oasis in Zion’s desert environment. Ferns, moss, and wildflowers thrive in the microclimate by the water. As you hike, especially behind the waterfalls, take in the cool, moist air – it’s a nice break from the typical dry heat. I found it rejuvenating, almost like nature’s air conditioning.
- Family Friendly: If you’re a first-timer who’s a bit nervous about going solo, you might start with Emerald Pools. You’re never far from the Lodge (civilization) and there are usually other people around. That can ease you into the feel of hiking alone before you tackle bigger treks.
Hiking to Emerald Pools without a guide was straightforward and delightful. It’s proof that not every “famous” hike in Zion has to be extreme – some are simply about enjoying waterfalls and greenery amid the rocks.
I ended that day with a satisfying dinner at the lodge’s café (and yes, a slice of their pizza which actually wasn’t too pricey and hit the spot). With the gentle sound of waterfalls still in my mind, I felt recharged and ready for more adventures.
Canyon Overlook

Sometimes big rewards come in small packages. Canyon Overlook Trail is a prime example – a short, one-mile round-trip hike that leads to a stunning viewpoint over lower Zion Canyon.
No guide needed here (there’s literally one path to the overlook), and it’s a perfect hike to slot into your itinerary, especially for a sunrise or early morning outing.
Trail Overview
The Canyon Overlook Trail is located outside the main canyon, near the east entrance of the Zion-Mt. Carmel Tunnel.
There is no shuttle to this trailhead; you have to drive (or get a ride) to the small parking area just east of the tunnel’s exit. The hike itself is about 1 mile round-trip (out-and-back) with some uneven rocky sections and wooden stairs, but only ~160 feet of elevation gain.
It’s rated moderate primarily due to a few areas with drop-offs – however, those exposed spots are mostly fenced or have railings for safety. It’s a family-friendly hike for the sure-footed, and it takes only about an hour or less.
I decided to catch the sunrise from Canyon Overlook. I drove from Springdale in the dark, entered the park, and went up the switchbacks to the long tunnel.
Driving through the Zion-Mt. Carmel Tunnel at dawn was memorable in itself – those window cut-outs flashing glimpses of the canyon in the first light.
Immediately after exiting the tunnel on the east side, I snagged a spot in the small parking lot (fits maybe a couple dozen cars at most). There’s also some roadside parking a bit further if needed. Because I went early, parking was plentiful; later in the day it often fills up, given the trail’s popularity.
Using my headlamp in the dim pre-dawn, I started the trail. The path led me along a ledge, up some steps, and across a cool section of boardwalk hugging the cliff. Even in low light, it was easy to follow.
I remember hearing the faint baa-ing of bighorn sheep – this area is known for them, though I didn’t see any that morning. As I reached the Canyon Overlook viewpoint, the sky was growing orange.
I perched on a rock and watched the sun crest the horizon, illuminating the great arch below (a huge hollowed-out feature in the cliff) and the whole expanse of Pine Creek Canyon and lower Zion Canyon beyond.
What a sight to behold with my own eyes – the East Temple, Bridge Mountain, the Towers of the Virgin in the distance, all glowing. And to think I was the only person up there at that moment! (A couple photographers arrived a bit later, but sunrise is generally quiet here except for die-hards.)
The view from Canyon Overlook is somewhat opposite of the usual Zion Canyon views – you’re looking westward into the canyon area you came from, and down into the pine-filled chasms below the bridge.
It’s a unique angle and absolutely worth the short hike. I felt completely safe hiking it alone in the early hour; the trail was intuitive. On my way back, full daylight now, I passed several families heading in.
We squeezed by each other on a narrower section (it has rails, so it’s fine). I made sure to be courteous and step aside when needed – no rush.
Best Time to Hike Canyon Overlook
I’m partial to sunrise here because of the magical lighting and fewer people. Sunset is also popular, but note you’ll be facing east from the overlook – so at sunset, the cliffs behind you turn colors, but the viewpoint itself is in shadow. Still, the canyon can look beautiful in the evening glow.
If you go mid-day, it’s still a great view, just with harsher light and more crowds. This trail is open year-round, weather permitting. In winter, check for any snow or ice – the trail could be slick in spots if icy, since it’s shaded in parts.
The park doesn’t usually close it, but you might need traction if it’s icy. Spring and fall are ideal times as usual. If going in summer mid-day, it will be hot and there’s not a ton of shade, but at least it’s a short hike.
Tips for Canyon Overlook Trail
- Parking & Timing: Because there’s no shuttle, parking is the crux. Early morning or late afternoon gives you a better chance. If you find the lot full, you might have to drive a bit further east to a pullout and walk back (carefully, since the road exits the tunnel and curves – watch for traffic). I timed my visit at dawn specifically to avoid parking stress.
- Bring a Light: If doing sunrise or sunset, have a headlamp or flashlight for the trail in the dark. The path isn’t dangerous, but you’ll feel more comfortable seeing where you step. I navigated with a headlamp easily.
- Mind the Kids: If you have kids or fear of heights, know that while much is fenced, there are a couple of unfenced ledges. Keep children close and don’t stray off the trail. I saw parents with toddlers up there and they managed fine with hand-holding and supervision.
- Enjoy the Features: Along the trail, notice the cave-like alcoves, and the wooden bridge that spans a little gully. They add character to this short hike. At the overlook, if you look down and right, you can spot the Great Arch far below – an enormous natural arch carved into the cliff side (you drove over it when coming out of the tunnel). It’s impressive from above.
- Wildlife: This area is known for desert bighorn sheep. Keep your eyes peeled on the slopes, especially in morning or evening. Seeing one is a treat! Also, bats often roost in the tunnel, so around dusk you might see some flitting about near the ends.
- No Restrooms/Water: There are pit toilets a short drive east at a picnic area, but none right at the trailhead. So plan accordingly.
Canyon Overlook was a gem of a self-guided hike – minimal effort, maximum view. It’s an example that you don’t need a guide to find the best spots; sometimes they’re just a quick scramble off the road.
Standing there at sunrise, I felt a profound connection to Zion’s beauty, energized to tackle more trails that day (spoiler: I went on to do a longer hike after breakfast). If you have a spare hour, don’t skip this one, and know that you can easily do it on your own.
Watchman Trail
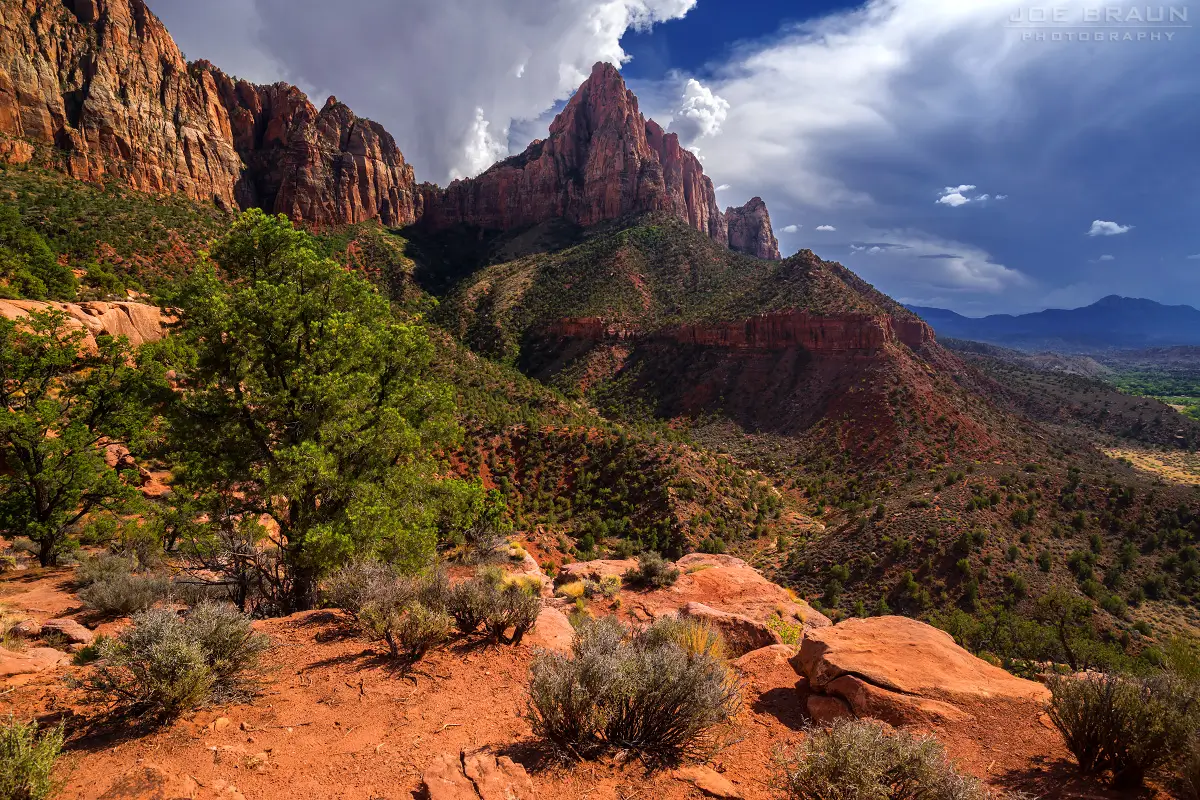
On my last evening in Zion, I wanted to cap things off with a mellow hike near the park entrance – a chance to say goodbye to the canyon with the sunset. The Watchman Trail was absolutely perfect for this.
This trail isn’t as famous as the others, but it’s often the first or last hike many do because it starts right by the Visitor Center. It offers wonderful views of Zion Canyon’s southern end and the town of Springdale.
Trail Overview
The Watchman Trail is a 2.8-mile round-trip out-and-back, labeled moderate with about 368 feet of elevation gain. The trailhead is at Shuttle Stop #1, Zion Visitor Center, but note that the trail itself is outside the shuttle-only zone (so even in times when shuttles aren’t running, you can drive to the Visitor Center and start from there easily).
The path leads up to a viewpoint on a lower ridge of Watchman Peak. It has some drop-offs but nothing too hair-raising, and the trail is broad enough in those areas. It’s a steady uphill for about 1.5 miles, then you reach a loop at the top that provides different angles of the view. There’s no permit or guide needed – just a nice trail to follow.
I started the Watchman Trail around 5:30 PM in June, when the heat of the day had begun to ebb. The trail begins by crossing a footbridge over the Virgin River from the Visitor Center area.
It then winds behind a ridge, gradually ascending. As I climbed the switchbacks, I could see the red cliffs glowing in the late sun.
Below, the green lawns of the campground and the rooftops of Springdale started to come into view. Being solo, I found this ascent peaceful – just me and my thoughts, processing all the amazing sights I’d seen in Zion.
About halfway up, I encountered a rocky section with a bit of ledge; I simply took my time, and it was fine. At one point, a big desert hare (jackrabbit) darted across the path ahead, giving me a little startle and then a chuckle. Also saw some lizards doing push-ups on the rocks (a classic Southwestern scene).
I reached the top “loop” area just as the sun was nearing the horizon. I walked the small loop to take in the panoramic views: to the north, the Towers of the Virgin and West Temple were bathed in golden light; to the south, the town of Springdale was visible with tiny cars and buildings; and right in front of me, the Watchman (a prominent spire near the park entrance) towered, living up to its name as the canyon’s guardian.
The sky started turning orange and pink, and I found a comfy rock to sit on. A couple of other photographers were around, but it was easy to find personal space.
Watching sunset from Watchman Trail was special – it felt like Zion was bidding me farewell with a beautiful display. As the sun dipped, the cliffs went from fiery orange to deep red to purple silhouettes.
I snapped some photos, but also just sat and savored the moment. Hiking without a guide meant I could linger as long as I wanted, and I did until the colors began to fade into twilight.
The descent in dusk was easy enough; I had my headlamp ready but found I didn’t need it until I got closer to the bottom under tree cover. The entire hike took me around 1 hour 45 minutes including my break on top.
Best Time to Hike Watchman Trail
I highly recommend late afternoon into sunset. The lighting on the Watchman formation and surrounding cliffs is gorgeous at that time, and you can watch the twinkle of Springdale’s lights if you stay after dusk. Just remember to carry a flashlight for the way down.
Morning is also nice, with the sun rising behind you to light up the valley. Midday can be extremely hot on this trail (there’s not a ton of shade on the upper parts). Spring and fall evenings are ideal with cooler temps. In summer, aim for early morning or start after 5 PM.
In winter, this trail is open and usually snow-free (being lower elevation), and a clear winter day would provide crisp views, though the sunset will be earlier and the temperature drops quickly once the sun’s gone.
Tips for Watchman Trail
- Convenience: If you’re staying in Springdale or the park campground, you can walk to this trailhead easily. No shuttle timing to worry about. This makes it a great “last day” hike if you’ve checked out of lodging and just want one more taste of Zion.
- Sunset Strategy: Bring a headlamp! Also, I noted roughly how long it took me to hike up so I could gauge how late I could stay. The trail isn’t long, but you wouldn’t want to get stuck halfway in total darkness without a light. I left the viewpoint shortly after official sunset, which gave me enough light to do half the descent, then used my lamp for the rest.
- Photography: For photographers, the Watchman Trail provides a different perspective than the famous bridge spot (near Canyon Junction) where everyone shoots Watchman with the river. Up here, you’re elevated and can capture the expanse of canyon and town. I found the images unique. Tripod not really needed unless you stay for star shots (which, by the way, Zion has great stars – I did see the first stars popping out as I ended the hike).
- Trail Etiquette: This isn’t a super crowded trail, but you might see a few people. Standard practice applies: yield to uphill hikers while you’re descending, and if you do go for sunrise or sunset, keep voices low and respect those there for the tranquility. I had a moment where a couple was chatting loudly on speakerphone at the top (why? we’ll never know) – a gentle request and they kindly saved the calls for later. It’s all about respect.
- Wildlife & Flora: Early morning or evening, you have a chance to see wildlife here. Mule deer often wander near the Visitor Center; and as mentioned, jackrabbits, lizards, maybe even foxes could appear. Also, notice the fragrant sagebrush and other desert plants along the way. After a rain, this trail smells wonderful with the aroma of wet sage in the air.
The Watchman Trail at sunset was the perfect reflective capstone for my Zion journey. I looked out at the landscape that I had spent days exploring – the tips of Angel’s Landing and Observation Point in the distance – and felt a satisfying sense of closure.
The nervous first-timer who arrived days before was gone; in their place was a confident hiker who had taken on Zion’s famous trails without a guide and gained skills and memories for a lifetime.
Budget Tips for Zion
Traveling to a national park can be expensive, but going DIY can save you a lot. From my time in Zion, here are some practical budgeting insights to keep your wallet happy:
- Park Entrance Fees: Zion charges $35 per vehicle (good for 7 days) or $20 per individual walk-in. If you have an America the Beautiful annual pass ($80) or other interagency pass, that covers entry. I had the annual pass, which paid for itself since I visited other parks on my trip. Tip: If you’re coming by shuttle or Uber from nearby, you’ll pay per person, but if you have a small group, it might be worth renting a car so everyone is covered by the vehicle fee. Also, if you’re only doing Zion for 1-2 days, there’s no single-day pass discount – it’s the same flat fee, so maximize that week or consider the annual pass if you’ll hit 3+ parks.
- Shuttle and Parking: The Zion Canyon Shuttle is free, which is a great perk! You don’t need to budget anything for in-park transit (no guide bus fees either). If you’re staying in Springdale, the town runs a free shuttle to the park entrance as well. Parking in Springdale can cost (some hotels or lots charge $10-20/day), but I found that if I arrived super early, I could snag free street parking near the visitor center. By staying in the campground for part of my trip, I avoided daily parking fees since I just walked to the shuttle.
- Permits and Tours: Doing it without a guide saved a lot of money. For instance, some outfitters charge quite a bit for guided Angels Landing or Narrows hikes. Instead, I spent just $6 on the Angels Landing lottery application (and $3 for myself when I got the permit). The Narrows day hike cost me nothing permit-wise (I didn’t do the top-down which would have required a $25 wilderness permit). If you plan to do the Narrows top-down or any overnight backpacking, factor in about $25 for Zion’s wilderness permit. But for all the day hikes I’ve discussed, permits were either inexpensive or not required. That’s a huge saving over guided tour prices.
- Gear Rental Costs: The main rental was Narrows gear. I paid roughly $38 for the package at Zion Outfitter (prices hover in the $30–40 range for shoes, socks, stick). If you go in colder months and need dry pants or suits, that might be more (~$55–80). Still, going solo, I only rented what I needed for a day rather than paying for a guide package. Trekking poles, if you want them for other hikes, can sometimes be rented too, but I just brought my own collapsible ones in my luggage.
- Lodging: Zion has options from camping to luxury lodges. I did a mix to save money:
- Camping: I stayed at Watchman Campground for $20 per night (tent site). It’s right by the Visitor Center, super convenient. I reserved it 4 months in advance – campsites are highly sought after. South Campground was another option (similar price) but at the time was first-come or limited reservations and closes in winter. If you’re up for roughing it a bit, camping is the best budget option and a lovely experience under the stars.
- In-Park Lodge: I treated myself to one night at the Zion Lodge in the canyon. Rooms were about $250 in shoulder season (and higher in summer), but the experience of staying inside the canyon was unique – plus I could catch an early shuttle literally at the doorstep. If you split that cost with someone, it’s not too bad. The lodge offers winter rates that can be more reasonable, and sometimes they have deals in off-season. Book early (13 months ahead opens the bookings, and it fills fast).
- Springdale Hotels: The town of Springdale (just outside the park gate) is convenient but generally expensive. Budget hotels were hard to find in peak season. Expect $200+ per night for most places in summer. I was on a budget, so instead of Springdale, I stayed a couple of nights in La Verkin (30 minutes west) where a clean motel was ~$100 per night – much cheaper. That meant a bit of a drive each day, but the savings were big. Another nearby town is Hurricane (about 40 min away) with similar rates. If you’re okay with an hour’s drive, St. George has plenty of chain hotels at good prices, but that’s only worth it if you’re doing other things in that city or couldn’t find closer lodging.
- Kanab or East Side: On another trip, I stayed in Kanab (45 min to east entrance) – also cheaper rates and a cute town. However, if your focus is Zion’s main canyon, staying on the Springdale side is more convenient to start hikes early.
- Hostels/Airbnb: There was talk of a hostel possibly coming to Springdale, but I’m not sure of its status. Airbnb options are there in surrounding towns, sometimes offering a room or guesthouse for less than hotel rates. I met a traveler who did a private room in a home in Rockville (5 min from Springdale) for about $70/night. Always weigh the commute vs. cost.
- Food and Supplies: Food in the park and Springdale tends to be pricey because it’s a tourist area. For budget travelers:
- Groceries: I brought groceries from home/previous stops – stuff for sandwiches, trail mix, instant oatmeal, etc. Springdale has a small grocery (Sol Foods), which is well-stocked but more expensive than supermarkets in Hurricane or St. George. If you can, stock up before reaching Springdale (there’s a Walmart and grocery stores in Hurricane about 30 minutes away).
- Cooking: If camping, you can cook at your site or use camp stoves. I made coffee and simple breakfasts at my campsite, which saved money and time.
- Eating Out: I allowed myself one restaurant meal a day. A sit-down dinner in Springdale will run about $20–$30 per entrée. For example, I had a lovely pizza and salad one night that cost ~$25 with tip. Not outrageous, but not super cheap either. Look for “cheap eats”: there’s a café (Deep Creek Coffee) that does sandwiches and breakfast burritos for under $15, a deli at Sol Foods for grab-and-go sandwiches, and some food trucks occasionally. Also, Zion Lodge has a casual Snack Bar (Castle Dome Café) where I got a slice of pizza for around $6 and a burger for ~$12, which in the park is decent. Their menu was simpler and more affordable than Springdale’s trendy restaurants.
- Water is Free – Use It: Never pay for bottled water in Zion! Bring your own bottle and refill at the many water stations. The water is clean and cold. I saw some folks buying overpriced bottled water at the gift shop – no need, the park’s taps are great. Same goes for snacks; pack your own rather than paying double at convenience stores.
- Breakfast: Many hotels in Hurricane/St. George included free breakfast. The one I stayed at had the usual cereal, eggs, etc., which fueled me for the morning. If yours doesn’t, consider instant oatmeal or something in your room to save on a restaurant breakfast.
- Transportation: I flew into Las Vegas, which is the closest major airport (~2.5 hours drive). I rented a car for the week for around $300. If you’re solo and that’s steep, look into shuttles from Vegas to St. George, then St. George to Springdale – there are some (e.g., St. George Shuttle) that might run $30–$40 each way. But once in Springdale, you wouldn’t need a car due to the town and park shuttles. I personally like having a car for flexibility (like driving to trailheads such as East Mesa or Canyon Overlook, or doing a side trip to Bryce Canyon). Gas was about $4/gallon at the time, and I used maybe $50 worth for all the driving around. Also, factor in national park parking if you drive: if you’re not staying at a place with parking, the city of Springdale has pay lots. However, many hotels include parking for guests. I saved money by using the free town shuttle from my motel into the park instead of paying for parking.
Overall, by hiking without a guide and planning smart, I found Zion quite affordable. I probably spent more on souvenirs (those Zion t-shirts are hard to resist!) than I did on any tour or guide fees.
My biggest splurge was the lodge night, which was balanced out by camping nights. So, budget-wise, a self-guided Zion trip can range from shoestring (camping + cooking + shuttles) to moderate (hotels + some eating out) depending on your style, but in all cases you’ll save significantly on guide or tour costs.
And the experiences you gain from doing it yourself – priceless.
Trail Safety and Etiquette for First-Timers
Hiking Zion’s trails without a guide means you’re the captain of your adventure – and also responsible for your own safety.
Here are some crucial safety tips and etiquette guidelines I learned (sometimes the hard way) during my trip, to help you hike confidently and responsibly:
Hydration, Hydration, Hydration
The desert environment in Zion can sneak up on you. Even when temps feel mild, the air is dry and you’re losing moisture. I aimed to drink at least 1 liter of water every 2-3 hours of hiking, more if it was hot.
Zion’s website reminds visitors to “drink plenty of water” and bring more than you think you need. I carried a 3L hydration bladder on longer hikes and had electrolyte tablets to add on super hot days.
Don’t rely on stream water (and definitely don’t drink from the Virgin River due to possible cyanobacteria and other contaminants) – instead, refill at known stations. Dehydration can cause dizziness or worse, so make this a priority.
Weather and Flash Floods
In Zion, different risks come with different seasons: summer brings extreme heat and thunderstorms. Those storms can cause dangerous flash floods, especially in The Narrows and any slot canyons.
If you hear thunder or see storm clouds, get out of narrow canyons and away from high exposed areas. In winter, watch for snow or ice – a sunny day in town can mean icy trails in the shade at higher elevations. The park posts flash flood potential ratings – heed them.
I carried a small NOAA weather radio and checked park alerts each morning. One day had a flash flood warning, so I avoided all water hikes that day; it’s simply not worth the risk, as flash floods are deadly. If caught unexpectedly in rain in a canyon, seek high ground immediately.
Trail Etiquette
Good manners on the trail keep everyone safe and happy:
- Right of Way: Generally, uphill hikers have the right of way (they’re working harder, after all). I followed this, stepping aside on narrow sections to let those coming up pass, when I was descending. On Angels Landing’s chains, it was more about communication – take turns on narrow spots.
- Don’t Play Music Out Loud: Enjoy the sounds of nature. If you want music, use headphones (but I’d advise against it if hiking alone, so you can hear your surroundings).
- Pack Out Trash: Zion’s trails have no garbage cans beyond trailheads. Whatever you carry in, carry it out – including food wrappers, orange peels, etc. I kept a ziplock in my pack for trash. Rangers ask hikers to “pack out all trash”. I even picked up others’ litter when I saw it – leaving the park cleaner is a great feeling.
- Restroom Breaks: Use the restroom before hitting the trail (major trailheads like Visitor Center, Grotto, Temple of Sinawava have facilities). If nature calls on the hike, go at least 200 feet away from water sources and the trail, and bury any solid waste deep. For women, packing out used toilet paper in a ziplock is necessary – don’t leave TP in the wild.
- Leave What You Find: I know the pretty red rocks or wildflowers are tempting, but leave them for others to enjoy. It’s part of Leave No Trace – take only pictures. I once pocketed a neat rock then put it back, thinking, “This belongs to Zion, not me.”
- Be Considerate with Photos: At crowded viewpoints, take your photo and then step aside so others can get theirs. I saw some bottlenecks simply from someone monopolizing the perfect angle. When solo, I often offered to take a photo for someone else – a great way to make friends and share goodwill.
Wildlife Encounters
Zion has wildlife like mule deer, bighorn sheep, lizards, snakes (including rattlesnakes), and many small creatures (squirrels, chipmunks, birds). Most animals will leave you alone if you leave them alone. I kept a respectful distance – use your zoom, don’t approach.
The squirrels in busy areas can be aggressive beggars; do not feed them. One nearly climbed into my lap at Scouts Lookout looking for food. Reminding myself and others that “a fed animal is a dead animal” helps – feeding them makes them dependent and can shorten their life.
As for rattlesnakes, they exist in Zion but are not commonly seen on busy trails. Still, be cautious stepping over logs or rocks where you can’t see – I didn’t see any snakes, but a fellow hiker reported one off the trail near Emerald Pools.
If you do encounter a snake, give it space; do not try to move or harass it. They usually rattle as a warning – heed it and back away slowly. I also learned Zion is home to tarantulas (cool!) that sometimes wander on roads in fall evenings – they’re harmless, so no worries if you see one.
Emergencies
Without a guide, you should have a plan if something goes wrong. Cell service is spotty in the canyon (I got occasional signal on higher elevations, but almost none deep in). I noted that if I had an emergency, I’d have to either call 911 if lucky to have signal, or more likely ask fellow hikers to get help or send word.
The park posts emergency info – call 911 and it connects to Zion dispatch. If you’re injured and alone and can move, carefully make your way to a trailhead or ranger if possible.
Fortunately, on popular trails you’re rarely truly alone – good Samaritans abound. I carried a whistle (three blasts is a distress signal) but never needed it.
Also, consider carrying a basic first aid – moleskin for blisters, bandages for scrapes. I helped a hiker bandage a cut knee on the Narrows, and I was glad I had a little kit.
Know Your Limits
This might be the most important safety tip. As a first-timer, it’s easy to be gung-ho (I certainly was) and sometimes overestimate your ability or underestimate the trail. Be honest with yourself. If you’re exhausted, turn around. If that cliff section is too much, don’t go further.
There’s no shame in saying “I’ll save this for next time.” Zion will always be there. I skipped one trail I had wanted to do (Hidden Canyon, which was closed, and also pretty sketchy pre-closure) because I didn’t feel like I had the energy or nerve after a long day. Instead, I took a relaxing walk by the river.
And I have zero regrets – it was the right call for my safety and enjoyment. As a solo hiker, there’s a mantra I follow: “No summit or destination is ever worth your life.” Listen to that inner voice if it’s giving warnings.
Leave No Trace
I’ve touched on some principles, but to summarize the main ones to practice: Plan Ahead and Prepare (which you’re doing by reading this!), Travel and Camp on Durable Surfaces (stay on the trail; cutting switchbacks causes erosion – I saw a few spots where people had and it was not good), Dispose of Waste Properly (trash and human waste as mentioned), Leave What You Find, Minimize Campfire Impact (not really an issue on day hikes; campfires are restricted in Zion), Respect Wildlife, and Be Considerate of Others.
The park even links these principles on their site to encourage responsible hiking.
Following these safety and etiquette guidelines, I felt comfortable and secure even without a guide by my side. Zion’s well-traveled trails and friendly fellow hikers give a sense of community – you’re alone but not really alone out there.
By being prepared and respectful, I earned nods of approval from rangers I chatted with, who were happy to see visitors taking the self-guided approach seriously. And most importantly, I stayed safe and had an absolute blast.
Zion Adventure Awaits
Writing this guide, I’ve relived each step, wade, and scramble I took in Zion, and I hope you’re feeling inspired and more confident to create your own story on these trails.
Going without a guide in Zion National Park isn’t just feasible – it can be deeply rewarding. You’ll move at your pace, connect with fellow hikers organically, and perhaps discover layers of the park (and of yourself) that a packaged tour might gloss over.
Remember, preparation is your friend. Do your homework on permits and conditions (the official park website is an invaluable resource for maps, weather, and updates – I checked it often).
Equip yourself with the right gear and plenty of water. Then, trust in your abilities. Start with easier hikes like Emerald Pools or Watchman Trail to build your confidence. Soon enough, you’ll be tackling Angels Landing’s chains or wading into the Narrows like it’s second nature.