

I remember stepping into Yosemite Valley at dawn, the granite face of Half Dome glowing pink in the sunrise and the hush of morning broken only by the distant roar of a waterfall.
In that moment I felt the magic of this place, a mix of awe and an urge to explore every corner. In this article, we’ll journey through easy to moderate hikes and iconic natural landmarks you shouldn’t miss, seasoned with personal insights and tips to make your visit unforgettable. Lace up your boots, Yosemite is calling!
Yosemite Valley
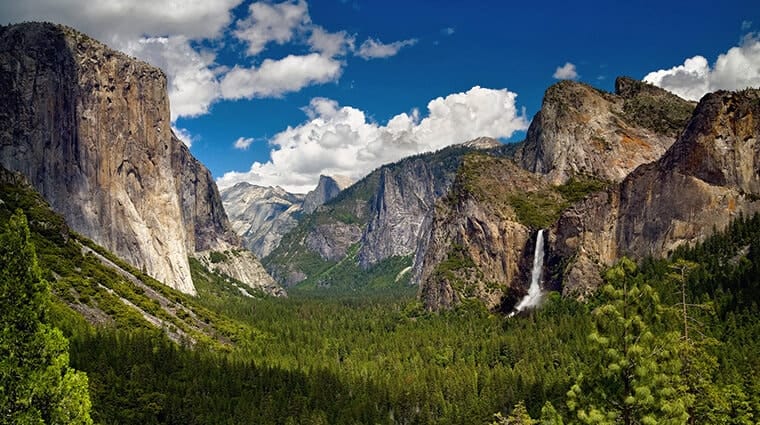
Millions of visitors pause at this legendary roadside pullout (on Highway 41/Wawona Road) to soak in the panorama of glacier-carved cliffs and cascading waterfalls.
If you arrive at sunrise, you might have Tunnel View all to yourself – the valley below cloaked in early morning mist, with golden light breaking over Half Dome. It’s one of those vistas that truly lives up to the hype, and it’s completely accessible year-round (no hiking required, just a parking area).
On a clear afternoon, you may even catch a rainbow shimmering in Bridalveil Fall’s mist from this vantage. This classic viewpoint sets the stage for the adventures ahead.
Bridalveil Fall Trail (Easy; Year-Round)
One of the first waterfalls you’ll encounter in Yosemite Valley is Bridalveil Fall – and a short 0.5-mile walk is all it takes to stand at its base.
The trail is paved and mostly level, suitable for almost everyone (including kids and strollers), and leads to a viewing platform where you can feel the mist on your face in spring.
In spring and early summer, Bridalveil thunders down 620 feet with such force that you might need a rain jacket; in drier months its flow softens to a delicate swaying cascade.
The trail is open all year (expect some icy patches in winter).
Trailhead & Access: The trail begins at the Bridalveil Fall Parking Area along Southside Drive. Come early in summer, the lot fills up quickly and traffic can back up. If the main lot is full, you can park a bit down the road and walk an extra 0.25 miles across Bridalveil Creek to reach the falls, enjoying unique views along the way. (Note: there is no shuttle to Bridalveil Fall currently, so driving or a long valley walk are the ways to get there.)
Highlights: Feel the cool spray on a hot day and listen to the wind carry the fall’s whispering veil, a family-friendly introduction to Yosemite’s waterfall wonderland. Just be sure to stay on the paved path, as the boulders near the base are extremely slippery and off-trail scrambling has led to serious injuries.
Lower Yosemite Fall Trail (Easy; Year-Round)
To experience North America’s tallest waterfall up close, don’t miss the Lower Yosemite Fall Trail.
This easy 1-mile loop circles the base of Yosemite Falls, giving you views of both the 320-foot lower fall and the even taller upper fall plummeting above. In spring and early summer, the full cascade is deafeningly loud and powerful – stand on the footbridge at the base and you’ll be drenched in spray as the waterfall roars past (you might even catch a rainbow in the mist).
By late summer, however, Yosemite Falls often dwindles to a mere trickle and can even dry up by autumn. The paved loop is mostly flat (50 ft elevation gain) and part of it is wheelchair accessible when not covered in snow.
Along the way, interpretive exhibits share the area’s natural and cultural history, a great opportunity to pause and let kids learn about how this iconic waterfall has inspired people for generations.
Trailhead & Access: Start near the Lower Yosemite Fall trailhead (shuttle stop #6). There’s no dedicated parking at the trailhead, so park at Yosemite Village or the Yosemite Falls parking area and walk a short distance, or simply hop on the free valley shuttle to stop #6.
For the best experience, walk the loop clockwise – you’ll get an eye-popping head-on view of Yosemite Falls as you approach from the west side. Highlights: In spring, the thunder of Yosemite Falls is unforgettable, and in winter the falls may turn to a silent, icy lacework on the cliff.
Whenever you visit, look up – the sheer height of the waterfall (2,425 feet combined) really hits you from the valley floor. This short trail is perfect for families and anyone seeking a big reward for minimal effort. (Just keep little ones from scrambling on rocks near the creek – they’re slippery even when dry.)
Cook’s Meadow Loop (Easy; Year-Round)
For a gentle stroll with 360° views of Yosemite Valley’s icons, try the Cook’s Meadow Loop. This 1-mile flat walk (boardwalk and path) meanders through a broad, open meadow in the heart of Yosemite Valley.
As you saunter, you’ll be treated to simultaneous views of Yosemite Falls, Half Dome, Glacier Point, and Sentinel Rock, it’s a photographer’s dream, especially in morning light. In spring the meadow is lush and green, with wildflowers and sometimes frazzled fawns following their mothers. In summer, the boardwalks keep your feet dry above the marshy grass.
Come autumn, the meadow grasses turn gold, making Half Dome’s granite face even more striking in contrast. Even in winter, this loop is magical – imagine the meadow blanketed in snow, with Yosemite Falls dropping in the distance like a ribbon of white.
Trailhead & Access: You can begin at the Yosemite Valley Visitor Center (shuttle stop #5) or at Sentinel Bridge parking area, the loop can be joined from multiple points. If starting from the visitor center, follow the bike path west to cross into the meadow near shuttle stop #6, then follow the boardwalk toward Sentinel Bridge.
Don’t miss walking out onto Sentinel Bridge itself (midway through the loop) for the classic view of Half Dome reflected in the Merced River. The entire route is typically wheelchair accessible when not snow-covered.
Highlights: Cook’s Meadow is an ideal picnic or reflection spot, with the scent of pine on the breeze and views in every direction, you truly feel in Yosemite’s grandeur. As you walk, you might spot deer grazing and will certainly hear the roar of Yosemite Falls across the meadow in spring.
Please stay on the boardwalk and established paths, as wandering into the meadow damages the fragile ecosystem (and it’s explicitly prohibited). This mellow walk proves you don’t always need a strenuous hike for a huge payoff in scenery.
Mirror Lake Trail (Easy-Moderate; Year-Round)
Fancy a lakeside walk at the base of Half Dome? The Mirror Lake Trail offers a peaceful escape from the busier valley spots. It’s a 2-mile round trip to the lake and back (1 mile each way on a paved service road), or 5 miles for the full loop around Mirror Lake/Tenaya Creek (which is a bit rockier and thus moderate).
The first section to the lake is relatively easy and great for families – you’ll walk through oak and pine forest with the massive shoulders of Half Dome and Mount Watkins towering above.
Mirror Lake isn’t a true lake but rather a seasonal pool in Tenaya Creek. In spring and early summer, it’s typically full of fresh snowmelt and lives up to its name with beautiful reflections of the granite cliffs in calm water. You can get that iconic photo of Half Dome’s face mirrored in the still pond.
By late summer, however, Mirror Lake often dwindles to a meadow, earning it the nickname “Mirror Meadow” (don’t be surprised if you find more sand and grass than water in fall). Still, the area is lovely year-round – even in winter it’s a quiet spot, though trails can be icy.
Trailhead & Access: Start at shuttle stop #17 near North Pines/Happy Isles. From there, follow the clearly marked path up Tenaya Canyon. Bikes, strollers, and even wheelchairs (and leashed pets) are allowed on the first paved mile to the lake viewpoint. If you do the full loop, know that beyond the lake the trail becomes a dirt path with some rocky sections and footbridges.
Note that in winter, the south side of the loop can remain very icy while the north side might be clear, many hikers opt for an out-and-back on the north side in snowy conditions.
Highlights: At Mirror Lake, stand still and soak in the scene: the base of Half Dome looms directly above, and you’re gazing up Tenaya Canyon, one of Yosemite’s less-traveled gorges.
It’s a perspective of Half Dome you can’t get elsewhere, looking straight up its sheer face from the valley. Bring a picnic and sit by the water’s edge (in spring) or on smooth granite slabs. Just remember there are no garbage cans, pack out all your trash and food scraps to keep the area wild and clean.
Also, never attempt to swim or shortcut across Tenaya Creek when water is high; it may look shallow, but many a hiker has been swept off their feet by slippery rocks and swift currents in spring. Stick to the trail and you’ll be rewarded with tranquility just a stone’s throw from Yosemite’s busy core.
Mist Trail to Vernal Fall (Moderate; Spring–Fall)
If you’re up for a bit more challenge (and don’t mind getting wet in the spring), the Mist Trail is the iconic Yosemite hike short of Half Dome. This trail climbs alongside the Merced River to Vernal Fall, a 317-foot waterfall so close you can practically touch it.
You have options on this trail: 1.6 miles round trip to the Vernal Fall Footbridge (moderate; a good turnaround for many), 2.4 miles round trip to the top of Vernal Fall (strenuous, involves steep granite steps), or farther on to Nevada Fall (very strenuous).
For most visitors, I recommend going at least to the footbridge or the base of Vernal Fall for fantastic views, and if you’re feeling strong and conditions are safe, continue up the famous stone staircase to the lip of the falls.
Highlights & Difficulty: The hike starts at Happy Isles (shuttle stop #16) and immediately begins a steady uphill (the first mile is paved but steep). Along this stretch you’ll get peekaboo glimpses of Illilouette Fall across the valley in spring, and hear the roar of the Merced River.
At 0.8 miles, you reach Vernal Fall Footbridge, look upstream for a postcard-perfect view of Vernal Fall thundering over a cliff, framed by pines. Many people turn around here, but if you’ve come this far, I’d urge you to continue up the Mist Trail steps for 0.5 mile more to reach the top of Vernal Fall. Be warned: in spring and early summer, this stretch will soak you head to toe in waterfall spray (hence the trail’s name)!
There are over 600 granite steps to climb, often wet and sometimes slick with algae – take your time and use the railing if needed. The reward is worth it: along the stair climb, rainbows often form in the mist on sunny mornings, and you get ever-closer views of the pounding water.
Reaching the summit, you can stand behind a railing at the very brink of Vernal Fall and peer straight down into the gorge – a heart-pounding perspective on the power of nature.
Trail Notes: This trail is hugely popular and can be very crowded mid-day. For a more serene experience, start early (before 8 am) or later in the afternoon. In spring, wear a waterproof layer and secure your electronics – you will get wet.
Safety is paramount: the rocks are extremely slippery, and crossing fences or railings at the top has been fatal for past visitors – never enter the water or approach the edge beyond the railings (the current is deceptively strong).
In winter, parts of the Mist Trail close due to ice, but an alternate route via the John Muir Trail often remains open to reach Vernal Fall (ask at the visitor center or check current trail conditions if visiting in the off-season).
Trailhead & Logistics: Start from the Happy Isles trailhead. There is no parking here, so take the free shuttle to stop #16 or walk from Curry Village (~1 mile). Bring water – you can fill up at a fountain near the trailhead or at the footbridge (summer only), but beyond that there’s none on the trail.
If you plan to go to the top of Vernal or Nevada Fall, pack snacks and maybe a lunch to enjoy at one of the viewpoints (just be sure to guard your food from bold squirrels and ravens).
Highlights: The Mist Trail is often cited as the not-to-miss Yosemite hike for good reason: it’s short (if only going to Vernal Fall) but packs in outsized scenery and adventure. You’ll experience the raw, refreshing power of a waterfall up close, plus get sweeping views of the river canyon and High Sierra peaks as you ascend.
Families with younger kids might opt just for the footbridge view, while active teens and adults can push on. This trail can be taxing (it’s a 400 ft climb to the footbridge and 1,000 ft to the top of Vernal), but you can turn back whenever you’ve had your fill – even the lower views are phenomenal.
Just remember to turn around occasionally as you climb; the sight of Yosemite Valley getting smaller behind you is unforgettable. And when you’ve finished, that first sip of cool water back at the trailhead will be the best you’ve ever tasted!
Yosemite Valley Lodging & Camping: Staying overnight in Yosemite Valley lets you maximize your day. Two lodges operate year-round in the valley: The Ahwahnee Hotel (a grand historic hotel) and Yosemite Valley Lodge (more family-oriented, near the base of Yosemite Falls).
Waking up at Valley Lodge, for instance, means Lower Yosemite Fall trail is just a five-minute walk away! For a rustic experience, look into Curry Village (seasonal cabins and tent cabins in the valley’s heart) or Housekeeping Camp (seasonal, semi-open cabins by the Merced River).
Campers should plan far ahead, Upper Pines Campground (open all year) and other valley campgrounds require reservations months in advance during spring through fall. If you snag a spot at Upper Pines, you can stroll to Happy Isles and the Mist Trail right from your tent.
Note that Camp 4 (the historic walk-in campground beloved by rock climbers) is now on a reservation system too. Tip: Whether you opt for a hotel or a tent, try to book early (lodging reservations open 366 days in advance and fill up quickly for peak seasons).
If everything inside the park is full, towns like El Portal, Mariposa, or Oakhurst offer additional accommodations, and a shuttle bus (YARTS) can bring you into the valley from some of these communities.
Glacier Point and Panoramic Views

While Yosemite Valley immerses you in the towering granite walls, the Glacier Point area elevates you above them for jaw-dropping panoramas.
Driving up Glacier Point Road (open roughly late May through October) is like rising to an eagle’s vantage point over the park.
At the end of the road lies Glacier Point, perhaps Yosemite’s most spectacular lookout, plus several rewarding short hikes to other viewpoints.
If you’re visiting outside of the summer months, keep in mind this high country road will be closed by snow, but you can still experience views from the valley floor or even snowshoe to some rim viewpoints in winter (for experienced adventurers).
For most travelers, though, late spring through fall is the time to explore these sights.
Glacier Point (Easy Viewpoint; Summer–Fall)
Standing at Glacier Point, 3,200 feet above Yosemite Valley, I felt like I was on the edge of the world. This famous overlook provides a commanding view of Half Dome and a wide swath of Yosemite’s high country, as well as a bird’s-eye perspective straight down into Yosemite Valley.
From the railed lookout, you can see Yosemite Falls tumbling on the left, Nevada and Vernal Falls as tiny silver ribbons far below, and the Merced River winding through the valley floor. Interpretive signs help you pick out features, but you’ll likely be speechless at the sheer grandeur.
Most people drive the 30 miles (1-hour) from Yosemite Valley or Wawona to reach Glacier Point, though there is also a popular tour bus that offers one-way trips (you can ride up and then hike down the Four Mile Trail if you’re up for a strenuous adventure).
Trailhead & Access: A short, paved path (approx. 300 yards, wheelchair-accessible) leads from the parking area to the viewpoint itself. Even that short walk will have you short of breath – partly due to the altitude (7,214 ft) and mostly due to the stunning views at every turn.
There’s a geology exhibit and a historic stone amphitheater area where ranger talks are given in summer. Glacier Point has restrooms, a little gift shop/snack stand (summer only), and ample but often busy parking.
Highlights: If you can, time your Glacier Point visit for either early morning or sunset. At sunrise, the first light paints Half Dome’s face a delicate pink, and the valley below is quiet and still, absolutely worth the early alarm.
At sunset, the sky might burst into oranges and purples as the sun dips behind the Sierra, and on certain summer evenings, you might catch the silhouette of hikers headlamps way up on Half Dome’s summit (a reminder that big adventures await if you ever return for the all-day hike).
Note that Glacier Point is also incredible at night – on a clear new-moon night, the starry sky is dazzling, and you can often see the twinkling lights of climbers bivvied on the face of Half Dome across the way. (Bring a jacket; it gets cold after dark.)
Seasonal Notes: Glacier Point Road typically opens to cars in late May and closes with the first heavy snowfall (often by November). In 2025 it opened as early as May 10th after plowing.
Outside of the road access season, the only way here is via a 10.5-mile cross-country ski or snowshoe trek from Badger Pass in winter, a serious undertaking only for well-prepared backcountry skiers (there’s even a ski hut you can reserve in winter for an overnight stay). For most visitors, stick to the warmer months.
And if you’re visiting in 2025 or beyond, be aware that Yosemite has occasionally implemented a peak-hours reservation system for park entry during summer; arriving at Glacier Point between 6 am and 2 pm in peak season may require a reservation or entering before/after those hours. Once you’re up there, though, no permit is needed to enjoy the view!
Sentinel Dome & Taft Point (Moderate; Summer–Fall)
For jaw-dropping views with minimal effort, two of my favorite short hikes start along Glacier Point Road: the trails to Sentinel Dome and Taft Point. Many people pair them together as a 5-mile loop, but you can do either individually for a shorter outing (each is about 2.2 miles round trip on its own).
Sentinel Dome is a 1.1-mile hike (one-way) to a granite dome that you can climb for a 360-degree panoramic view that arguably rivals Glacier Point’s. The trail is a gentle ascent through forest and open granite slabs, gaining about 400 feet.
The final stretch is a short scramble up the dome’s slope, but it’s not too steep , just follow the switchbacks on the rock. At the top, you’re rewarded with an unreal vista: Yosemite Valley yawning beneath you, Half Dome prominent to the northeast, and in the distance the peaks of the High Sierra march toward the horizon.
If you’re up there alone or at sunset, it can be a truly spiritual moment. (Fun fact: A famous Jeffrey pine grew on Sentinel’s summit, featured in many old photographs, but it died in drought decades ago; its weathered skeleton remained until recently.)
Taft Point, on the other hand, is known for its dramatic drop-offs. It’s about 1.1 miles (one-way) through woods and wildflower-filled glades to the edge of Yosemite Valley’s rim.
Suddenly you emerge at a railing with nothing but air beneath your feet, the vertical cliffs plunge 3,000 feet straight down to the valley! From Taft Point you have an expansive view looking west: El Capitan across the valley, the Merced River ribboning below, and if you look east you can spot the tip of Half Dome.
Scattered around are fascinating ginormous fissures, cracks in the granite so deep you can’t see the bottom. Definitely hold onto children’s hands here; while the main viewpoint is fenced, those fissures are not, and you’ll want to keep a safe distance.
Trailhead & Access: Sentinel Dome and Taft Point share a parking area (the Taft/Sentinel Trailhead on Glacier Point Road, about 2 miles before Glacier Point). Parking is limited, so go early in the day or later in the afternoon once the Glacier Point crowds have left.
The trail to Sentinel Dome breaks off to the right about 0.5 miles in, while Taft Point continues straight. If you do make a loop, you’ll connect the two by a section of the Pohono Trail along the rim.
Highlights: These two hikes are a fantastic way to escape the often crowded Glacier Point lookout and have a more personal connection with Yosemite’s grandeur. On Sentinel Dome, I’ve shared quiet lunches with curious marmots and had the dome all to myself for sunrise, an experience I’ll never forget, watching the valley slowly fill with light.
At Taft Point, I’ve felt my heart flutter standing at the edge, legs turning jelly at the scale of the drop (keep one hand on the railing for comfort!). Both spots are phenomenal for sunset, photographers love Sentinel for the Half Dome alpenglow, and Taft for capturing El Capitan bathed in evening light.
Just remember a flashlight/headlamp for the walk back if you linger late, and never venture beyond railings or marked safe areas, as falls from these heights are not survivable.
Glacier Point Area Lodging & Camping: There are no lodges at Glacier Point itself (aside from the ski hut in winter), but you’re only an hour’s drive from Yosemite Valley or Wawona for hotels.
The closest campground was Bridalveil Creek Campground on Glacier Point Road – traditionally open in summer, but it has been closed for rehabilitation for several years (check the park website for status). If open, it’s a convenient spot for sunrise/sunset chasers in this area.
Otherwise, consider staying in the Valley or Wawona and driving up early. For a truly special experience, some visitors backpack overnight on the Glacier Point saddle (wilderness permit required) or even book the Glacier Point Ski Hut tour in winter for a rustic overnight with panoramic views.
But for most, a day trip from your basecamp elsewhere in Yosemite will suffice. If you’re camping, Wawona Campground (south end) is one of the nearer options (about 45 minutes from Glacier Point), and it’s open year-round with reservations.
Mariposa Grove of Big Trees
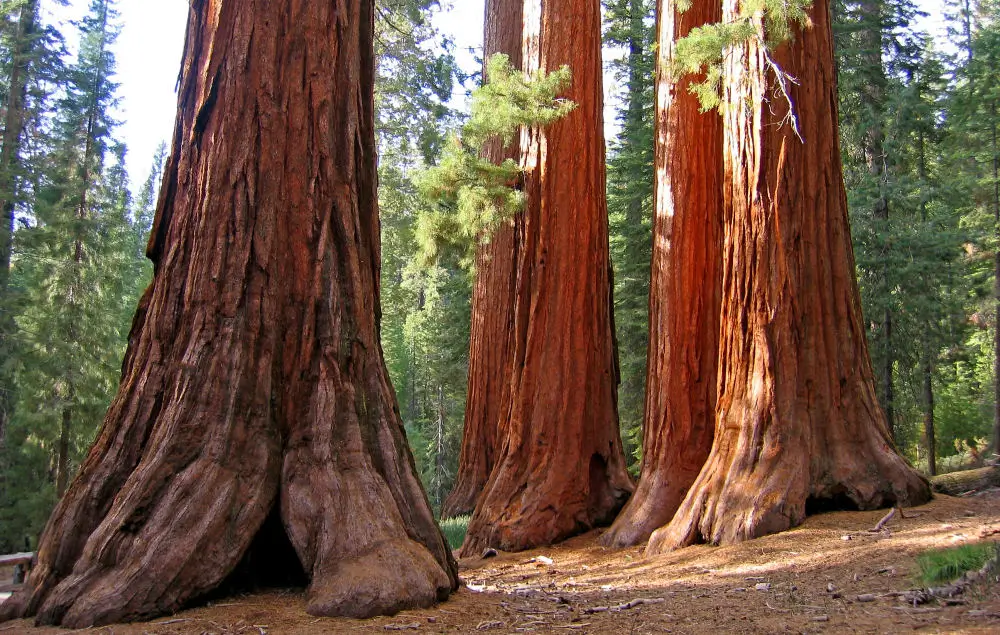
Walking among Yosemite’s giant sequoias is like entering nature’s cathedral – the towering red-barked trunks create a hush, and you can’t help but feel small and humbled.
The Mariposa Grove, located near the park’s South Entrance, is Yosemite’s largest sequoia grove with over 500 mature giant sequoias. This is a must-visit, especially for families, as the hikes here are enjoyable and not too strenuous, and the payoff, seeing trees nearly as old as the Pharaohs of Egypt, is something you’ll talk about for years.
Big Trees Loop Trail (Easy; Year-Round)
If you want a quick, accessible taste of the sequoias, the Big Trees Loop is perfect. This flat 0.3-mile loop at the grove’s start winds around some impressive giants, including the Fallen Monarch, a huge sequoia that fell centuries ago and whose trunk you can practically walk through, and other notable trees.
Interpretive signs along the way tell the story of giant sequoias: their astonishing lifespans (many here are 1,000–2,000 years old), their shallow roots that interlace for stability, and the role of fire in their life cycle.
The trail is partially paved and boardwalk, and fully wheelchair accessible when not snow-covered. In winter, this might be a snowshoe stroll, but the grove’s quiet beauty under snow is magical.
Trailhead & Access: The Mariposa Grove has a parking area (Mariposa Grove Welcome Plaza) near the South Entrance. In the shuttle season (typically mid-April through November), free shuttles run from the parking area to the grove arrival area, which saves you a 2-mile uphill walk. The Big Trees Loop starts right near the drop-off at the Mariposa Grove Arrival Area.
If the shuttle isn’t running (winter months), be prepared to hike those 2 miles on the gated road or the parallel Washburn Trail just to reach the grove. (The upside of a winter visit: far fewer people, and you might find yourself alone with the giants.)
Highlights: On this short loop, don’t miss the Fallen Monarch – its massive roots are exposed, giving a sense of how shallow sequoia roots really are for such tall trees.
Kids love scrambling around its enormous trunk (it’s hollowed out and has persisted for ages due to the tannins that resist rot). You’ll also see the Bachelor and Three Graces, a striking cluster of one big tree and three slimmer ones, illustrating how sequoias can thrive in families.
Walking the Big Trees Loop is less about “hiking” and more about immersing yourself in the aura of the grove. Take time to tilt your head all the way back and admire the canopy, these trees soar 200+ feet high.
Feel the spongy sequoia bark (it can be up to two feet thick!). This trail is a gentle introduction; those up for more can continue onward to see the grove’s biggest superstar, the Grizzly Giant.
Grizzly Giant & Mariposa Grove Loop (Moderate; Spring–Fall)
To truly experience the grandeur of Mariposa Grove, take the trail up to the Grizzly Giant and beyond.
The Grizzly Giant Loop Trail is about 2 miles round-trip from the trailhead (a bit more if starting at the shuttle drop-off) and 300 feet of elevation gain, a moderate hike that most visitors can handle with some water and patience. The trail is well graded, winding uphill among ever more gigantic sequoias.
After about a mile, you’ll encounter the Grizzly Giant itself, standing as patriarch of the grove. Estimated at nearly 3,000 years old, this behemoth has a trunk 96 feet in circumference and a branch almost 7 feet in diameter, bigger than many tree trunks! Standing before it is humbling; you can literally see scars of past centuries’ fires on its thick bark and its massive limbs stretching out, one famously almost horizontal like a giant arm.
Nearby is the California Tunnel Tree, the last living sequoia in the grove with a man-made tunnel cut through it (you can actually walk through the arch cut in its base back in 1895). It’s a reminder of bygone tourism eras – thankfully, we no longer cut holes in trees for “attractions.”
Trailhead & Access: From the Mariposa Grove arrival area, follow signs for Grizzly Giant; the trail is a wide path, once an old road. Visitors with disabilities can drive to a smaller parking lot closer to Grizzly Giant (with a placard), but most will be on foot. Along the way, benches provide rest spots – use them if needed; the air is thinner at 5,600 ft elevation.
Seasonal Notes: The grove is open year-round, but in winter the hike is considered strenuous as you’ll add the 2-mile walk from the closed road just to get there (often snow-packed; snowshoes recommended in deep snow). In peak summer, take the first shuttle of the morning (around 8 am) for a quieter experience, as trails can feel busy by mid-day.
Highlights: Aside from the Grizzly Giant (which is absolutely a highlight of the entire park), continue a bit further uphill to walk through the California Tunnel Tree, it makes for a fun family photo, and kids get a kick out of walking through a living tree. Just beyond, the trail loops back, but if you have energy, consider extending your hike to the Guardians Loop or up to Wawona Point overlook.
The full Guardians Loop Trail is 6.5 miles and will take you to the upper grove, passing the fallen Wawona Tunnel Tree and the “Clothespin” Tree (a sequoia with a huge natural burnt-through cavity you can stand inside).
Wawona Point, at the top of the grove, offers a sweeping vista of the Wawona area and distant Sierra , a worthy objective if you’re up for 4–5 hours of hiking. But for many, Grizzly Giant will be the turnaround.
Standing under its immense branches (one is so large it rivals the trunks of most other tree species!), you can reflect on all this tree has witnessed in its lifetime – from ancient indigenous tribes to the signing of the Yosemite grant by President Lincoln in 1864. It’s a living link to history.
Etiquette: Stay on trails in the grove; sequoia roots extend widely just beneath the soil, and wandering off-trail compacts the soil and can hurt these giants. Never carve or deface the bark. And although it’s tempting, do not take pine cones or pieces of sequoia bark, let nature keep its treasures (plus it’s illegal to remove anything).
Nearby Lodging & Camping (Mariposa Grove/Wawona): The grove is adjacent to Wawona, a quieter park area with its own historic charm. The Wawona Hotel (also known as Big Trees Lodge) is a lovely Victorian-era lodge just a few miles away, offering a veranda to relax on after your big-tree adventures; note it’s open seasonally (generally spring through fall). Staying there or at the Wawona Campground (year-round, by the South Fork Merced River) means you’re just minutes from Mariposa Grove.
Wawona even has a small store and gas station for supplies. If those are full, consider lodgings in nearby Fish Camp or Oakhurst (just outside the South Entrance). But if you can, spending a night in Wawona is delightful – you can combine a grove hike with an evening listening to the hotel’s piano player or take a short walk to the Pioneer Yosemite History Center in Wawona.
Camping at Wawona under the pines, you’ll be close enough to return for a moonlit stroll among the sequoias (with a flashlight and warm coat). Just remember, reservations for Wawona Hotel or campground are in high demand, so book early.
Tioga Road & Tuolumne Meadows
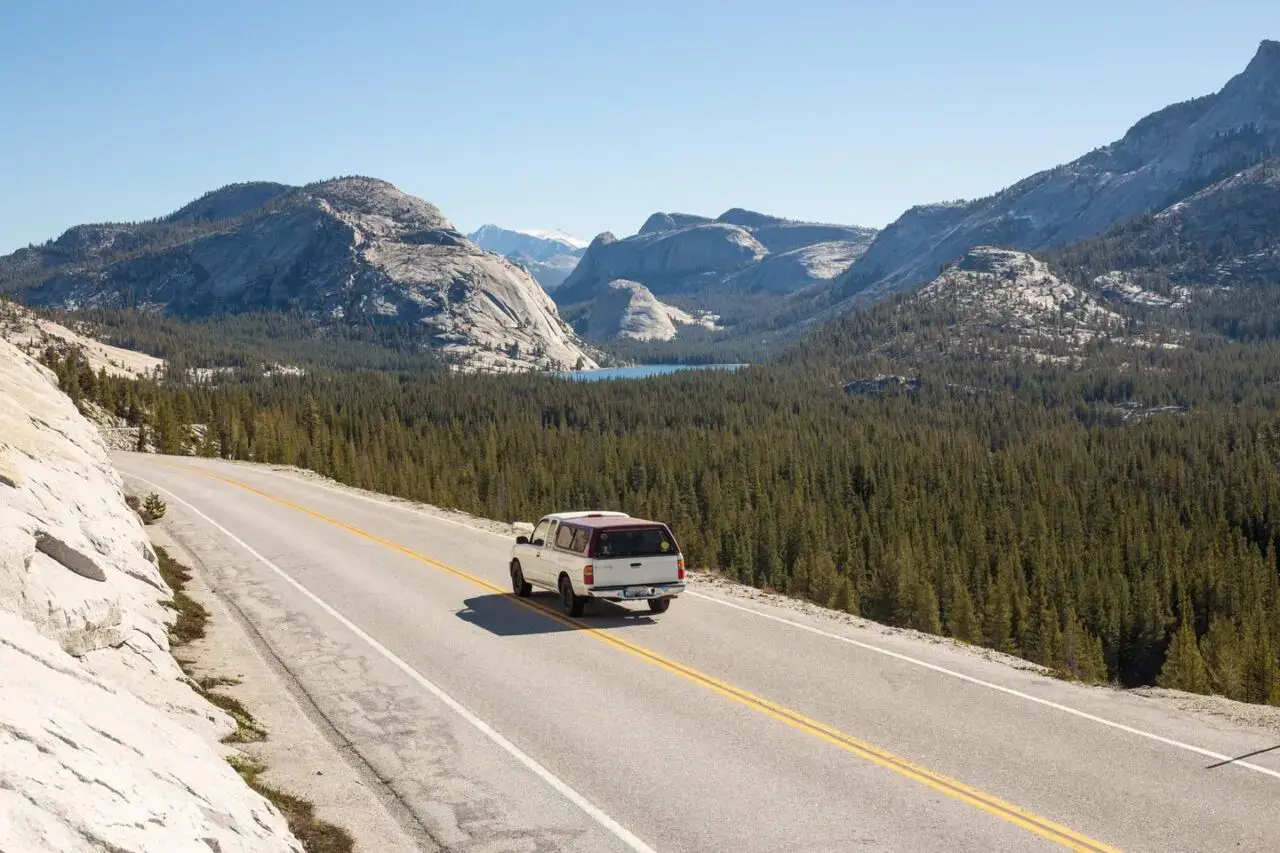
When the high country opens up (usually by late May or June, after the snowplows have cleared Tioga Road), Yosemite reveals an entirely different personality.
The Tioga Road traverses alpine meadows, glacial lakes, and granite domes at 8,000–10,000 feet elevation, showcasing Yosemite’s quieter side away from the valley crowds.
This area, including Tuolumne Meadows, Tenaya Lake, and Olmsted Point – is only accessible in summer and early fall (typically closing by November with the first snow). If your trip timing allows, absolutely venture up here to experience Yosemite’s “Roof of the World” scenery.
The hikes and sights we’ve picked are beginner-friendly and ultra-scenic.
Tuolumne Meadows & Soda Springs (Easy; Summer–Fall)
Tuolumne Meadows is a broad, subalpine meadow flanked by silver granite peaks , it feels like the quintessential Sierra wilderness, yet it’s just a short walk from the highway.
To stretch your legs and savor this meadow, take the easy 1.5-mile round-trip stroll to Soda Springs and Parsons Lodge. Starting near the Tuolumne Meadows Visitor Center or the Lembert Dome parking, a flat trail (often on boardwalk) leads you through wildflower-dotted grasslands to a modest wooden cabin enclosing Soda Springs.
Here, carbonated cold water bubbles up from the ground – a natural effervescent spring! Early settlers built a cabin over it in the 1880s to protect the spring (you can still peek in and often see the fizzy water). It’s safe to touch, though not recommended to drink due to high mineral content (and maybe some horse contributions upstream…).
From Soda Springs, continue a few yards to Parsons Memorial Lodge, a historic stone building where conservationists once gathered (John Muir’s Sierra Club meetings were held here). Often it hosts summer nature exhibits.
Highlights: The real treat is the scenery: looking west across Tuolumne Meadows, you’ll see the sinuous Tuolumne River reflecting the sky, flanked by domes like Pothole Dome and peaks such as Cathedral Peak in the distance.
Early morning or late afternoon, the light is gorgeous, and you might spot mule deer browsing or even a black bear far out in the meadow (keep distance and never feed wildlife, of course).
In July, the meadow erupts in wildflowers, purple shooting stars near seeps, yellow cinquefoils and ragwort, and red indian paintbrush.
Trailhead & Access: Park at the small lot just west of the Tuolumne Meadows Ranger Station/Visitor Center (or along the road nearby), the trail is marked for Soda Springs/Parsons Lodge.
It’s essentially flat and suitable for all ages; just note at 8,600 feet elevation, take it slow if you’re not acclimated. Also, stay on the marked trail and boardwalk to avoid trampling the delicate meadow (the soils are fragile, and restoration areas are roped off).
Extra Credit: If you want a bit more adventure, scramble up Pothole Dome at the west end of the meadow (an easy cross-country jaunt, just 0.5 mi and 200 ft up on granite) for a nice panorama, or tackle Lembert Dome on the east end (a steeper 2.8-mile round trip, moderate, with great views from the top). But those extend beyond “easy”, for many, the flat meadow walk is just right to soak in Tuolumne’s beauty.
Olmsted Point and Tenaya Lake (Easy; Summer–Fall)
Two unmissable stops along Tioga Road require hardly any walking at all, yet deliver world-class views and picnic opportunities.
Olmsted Point is a roadside pullout that offers a unique reverse angle view of Yosemite Valley’s icons. A short 0.2-mile stroll over granite slabs from the parking area leads to a viewpoint where you look southwest and spot an unusual sight: Half Dome’s distinct crown, but from the backside (you see its steep northwest face instead of the sheer front).
It might take you a moment to recognize it! In the distance beyond Half Dome, you can also see Cloud’s Rest and even bits of Yosemite Valley far below. Closer at hand, Tenaya Canyon stretches beneath you, a vast granite expanse that truly conveys the park’s glacial geology.
There are interpretive panels explaining how glaciers carved these domes and canyons. The point is named after famed landscape architects Frederick Law Olmsted and son, who were instrumental in park planning.
Highlights at Olmsted: It’s a fantastic place to pause and contemplate the forces that shaped Yosemite. Often there’s a cool breeze blowing up from the canyon. Keep an eye out for little bunches of alpine wildflowers clinging in the rock cracks, and for critters: ravens catch the updrafts here, and sometimes you’ll see a marmot sunning on a rock.
The view is especially sublime in late afternoon when the sun is at your back lighting Half Dome, or even under a starry sky (if you’re driving back late, Olmsted Point at night reveals the Milky Way glimmering over Tenaya Canyon).
Tenaya Lake, about 5 miles west of Olmsted, is rightly called the “Jewel of the High Country.” This large, serene lake set among granite domes sits right next to the road, with several picnic and pullover areas. Take a break here to dip your feet in the crystal-clear (and brisk!) water.
There are short trails along the shore, one can easily walk 1.5 miles from the east beach to the west beach on a level path. The sandy eastern shoreline near the parking area is popular for summer picnics and even swimming (if you can handle the cold).
I’ll never forget a picnic I had here: lounging on smooth granite slabs by the shore, pines framing the view, Mount Dana’s distant peak reflecting in the water like a mirror. It’s an idyllic spot for families to relax, kids can wade or play on the beach, while adults bask in the sun.
Access: Both Olmsted Point and Tenaya Lake have roadside parking lots. Olmsted’s lot is small; if it’s full, you can carefully park along the road shoulders (but obey signs). The walk to the viewpoint is over uneven granite – wear sturdy shoes, but it’s quite short.
Tenaya Lake has parking at the east end (best beach) and a smaller lot at the west end. Restrooms (vault toilets) are available at both locales. Seasonal Tips: Because these are around 8,000 feet elevation, they typically become accessible in June and remain open until snow closes the road in fall.
Early summer, Tenaya Lake might still have ice chunks floating from the spring thaw, and by September, the water is at its warmest (relative term, it’s always chilly). Kayaking and paddleboarding are allowed (bring your own; there are no rentals on-site), and you’ll often see people fishing for trout in the lake’s deep blue waters.
Leave No Trace: These high country spots feel pristine, help keep them that way. Don’t feed the jays, chipmunks, or squirrels begging for your crumbs; human food is harmful to wildlife, and they become pests.
Pack out all your garbage (I’ve picked up many micro-trash bits on Tenaya’s beach , every bit of wrapper or bottle cap removed helps). And resist the urge to take a glistening granite pebble as a souvenir – leave everything as you found it so the next traveler can experience the same unspoiled wonder.
High Country Lodging & Camping: Staying overnight in Tuolumne Meadows area lets you enjoy sunrise and sunset in the high Sierra, a treat since many visitors only pass through mid-day. The main in-park option is Tuolumne Meadows Lodge, which offers rustic canvas tent cabins (with beds) in summer – a short walk from the meadow and a great base for high country hikes (book early; it’s popular).
There’s also the White Wolf Lodge further west on Tioga Road (more canvas cabins) if Tuolumne is full. For campers, Tuolumne Meadows Campground (once the largest in Yosemite) has been under renovation but is slated to reopen – it’s historically open July through September, with reservations required, and puts you right next to the river and meadow.
Note it can get very cold at night, even in August, at 8,600 ft, pack a warm sleeping bag! Outside the park’s east entrance, the town of Lee Vining by Mono Lake has a few motels – about a 30-minute drive from Tuolumne but a good fallback if you’re exploring Tioga Road and couldn’t get into the campground.
Insider Tip: If you stay in the high country, take advantage of ranger programs at Tuolumne Meadows in summer, they often lead easy sunset walks or astronomy talks under the stars. And nothing beats grabbing a hot cocoa at the Tuolumne Meadows grill (if open) on a chilly morning, then wandering through misty meadows as the sun crests the peaks.
Practical Tips for an Unforgettable Yosemite Visit
Plan Ahead & Reserve
Yosemite’s popularity means lodging and campsites book up early. Reservations for park lodgings open a year in advance and are strongly recommended, especially for spring, summer, and holidays.
Likewise, campground spots release in monthly blocks and can fill within minutes of opening. If you can’t snag a spot inside the park, look into gateway towns like Mariposa, Oakhurst, or Lee Vining , but still reserve those well ahead. In peak summer 2024, Yosemite piloted a peak-hours entry reservation for driving into the park 6 am–2 pm on certain days.
Check the official park website before your trip to see if you’ll need a timed entry reservation (and if so, plan to book it on Recreation.gov when they become available).
Alternatively, arriving before 6 am or after 4 pm bypasses the need for a reservation on those days – a strategy for early birds and night owls. Arriving early also helps you find parking at popular trailheads before they fill up.
Best Times of Day
Take advantage of the early morning and late evening in Yosemite. Not only are these times cooler and less crowded, they’re when the park is most magical. Try to hit famous viewpoints (Tunnel View, Glacier Point) at sunrise or sunset for spectacular lighting.
Popular trails like the Mist Trail or Lower Yosemite Fall are wonderfully quiet if you start around sunrise, whereas by late morning they’ll be busy. Mid-day is great for a picnic or a siesta in the shade by the river.
Also, keep in mind the sun angle: for photography, morning light is best on east-facing features like Half Dome and Yosemite Falls, whereas afternoon light illuminates west-facing cliffs like El Capitan. If you’re hoping to see rainbows in waterfalls, aim for late afternoon at Bridalveil Fall and morning at Lower Yosemite Fall in spring when volumes are high.
And in winter, don’t miss late afternoon when the low sun can create the famous “firefall” effect on Horsetail Fall (in February) – just be prepared for crowds and special regulations if you’re attempting that.
What to Pack
Prepare for a bit of everything. Yosemite’s weather can change quickly, and temperatures vary by elevation. Dress in layers: mornings and evenings are chilly, even in summer, especially in the high country, but midday can be hot. Bring a waterproof jacket or poncho if visiting in spring (waterfall spray and sudden rain showers).
Sturdy, broken-in walking shoes or lightweight hiking boots are essential for trails, even easy ones have some rocks or puddles. Always carry water and snacks. Altitude and dry Sierra air can dehydrate you faster than you think; for a short 1-2 hour hike carry at least a liter per person (more if it’s hot).
A sun hat, sunglasses, and sunscreen are musts – the sun at higher elevations is intense. If you plan to explore the Yosemite natural park in the evening or early morning, bring a small headlamp/flashlight (with spare batteries) , Yosemite nights are very dark, and it’s easy to lose the trail or your footing without a light.
For spring/fall, throw a pair of light traction spikes in your bag if you have them, as some paved paths (like to Lower Yosemite Fall or Mirror Lake) can get icy in shoulder season. And don’t forget a bathing suit if you’d like to cool off in the river or lakes (just remember many water bodies are snowmelt-fed – brrr!).
Stay Safe
Yosemite is wild terrain, and a little preparation goes a long way. Pace yourself on hikes and heed your body’s signals: if you’re feeling dizzy or too breathless, take a break (you might be at altitude or simply a bit out of shape – there’s no shame in turning back early if needed).
Many injuries in the park are from slips and falls – wear appropriate footwear and watch for wet granite or loose gravel on trails. Steer clear of cliff edges and fast-moving water.
Every year, unfortunately, visitors who wade above waterfalls or climb beyond safety railings are swept to tragedy, do not underestimate the rivers and falls. Stay behind railings and obey warning signs; they are there for very real reasons. If you’re near any river in spring, keep a tight grip on children. Wildlife: Seeing animals can be a trip highlight – mule deer, marmots, coyotes, and black bears all roam Yosemite.
Enjoy them from a distance (use zoom on your camera or binoculars). Never feed animals, and keep your food secured. In fact, Yosemite’s black bears have been known to break into cars if they smell food or even scented items.
When parking at trailheads or overnight, remove all food, coolers, scented toiletries, trash, etc. from your vehicle or use the bear-proof storage boxes provided. If camping, use the bear lockers religiously. I learned a lot the hard way, and this piece on what I wish I knew before camping in Yosemite covers all the essentials first-timers often miss.
If you encounter a bear on a trail, keep calm, make noise so it knows you’re there, and give it plenty of space. Bear encounters are rare and injuries even rarer, as long as we don’t entice them with food. Smaller critters like squirrels and Stellar’s jays may beg, but please resist, feeding them is bad for their health and encourages aggressive behavior.
Lastly, respect the weather: thunderstorms can roll in fast on summer afternoons, especially at higher elevations. If you hear thunder, avoid ridges or isolated trees (get to safety if lightning is near). And in winter, carry tire chains and check road conditions; storms can close roads quickly.
Leave No Trace
Yosemite’s splendor has been preserved for us, and it’s our job to preserve it for those after us. Follow Leave No Trace principles on the trails: stick to established paths to protect delicate habitat, carry out all your trash (banana peels and peanut shells might seem natural but they don’t belong here and can harm wildlife), and never remove natural features (even picking wildflowers or stacking rocks is a no-no).
If nature calls, use restrooms where provided; otherwise, go at least 200 feet from water and trails and bury any waste. When you visit waterfalls and swimming holes, remember even biodegradable soap isn’t allowed, let’s keep the water pristine.
Noise pollution is also something to consider: in a place of such serenity, loud music or shouting can diminish the experience for others (and scare off wildlife). So, embrace the natural soundscape, the wind in the pines, the gurgle of the Merced River, the booming echo of Yosemite Falls.
One special note: Yosemite’s meadows, like Cook’s and Tuolumne, are very fragile. Walking into them creates lasting damage, so always use the boardwalks and trails provided. By treating the park gently, you ensure that the next hiker or the next generation will feel the same wonder you did.
Maximize Your Experience
A few extra tips to make your trip smoother: Use the free shuttles in Yosemite Valley (and to Mariposa Grove when in season) to avoid parking hassles. The Valley shuttle runs until 10 pm, so you can have a worry-free sunset dinner at Yosemite Valley Lodge and still get back to Curry Village or your car.
Consider biking in Yosemite Valley, there are bike paths throughout, and it’s often faster and more fun than driving. If you’re a photography enthusiast, scoping out viewpoints like Valley View (along Northside Drive) or Sentinel Bridge ahead of time can reward you with stellar shots of reflections and granite monoliths.
For those interested in park history or a break from hiking, stop by the Yosemite Visitor Center and Theater, the short film and the exhibits on how Yosemite became a national park are inspiring (and it’s a nice afternoon cooldown activity). And connect with the park rangers and naturalists: attend a guided walk or evening program if you can.
There’s something magical about learning the constellations under Yosemite’s sky or hearing Native American stories of Ahwahnee (the traditional name for Yosemite Valley) told by a local ranger. These experiences enrich your visit beyond the visuals.
Conclusion
Yosemite has a way of making you feel both insignificant and deeply connected to the natural world all at once. Its magic is that it offers grand inspiration (in those sweeping landscapes) and intimate joy (in the detail of a wildflower or the bravery of a chipmunk) in equal measure.
So take your time, be present in each moment, and let the park’s rhythms guide you. Happy trails, and may your Yosemite journey be as warm, immersive, and rewarding as the countless adventurers who came before you. Enjoy every vista and step gently, this is a place to treasure forever.