
Vienna International Airport can be confusing at first glance, especially when you see references to Terminals 1, 1A, 2 and 3 all under a single roof. The good news is that the airport is actually compact and logically laid out. With a little advance knowledge of how T1, T2 and T3 work, which airlines use which check in areas, and how the gates are split between Schengen and non Schengen zones, you can move through the airport quickly and with far less stress.
How Vienna Airport Is Laid Out
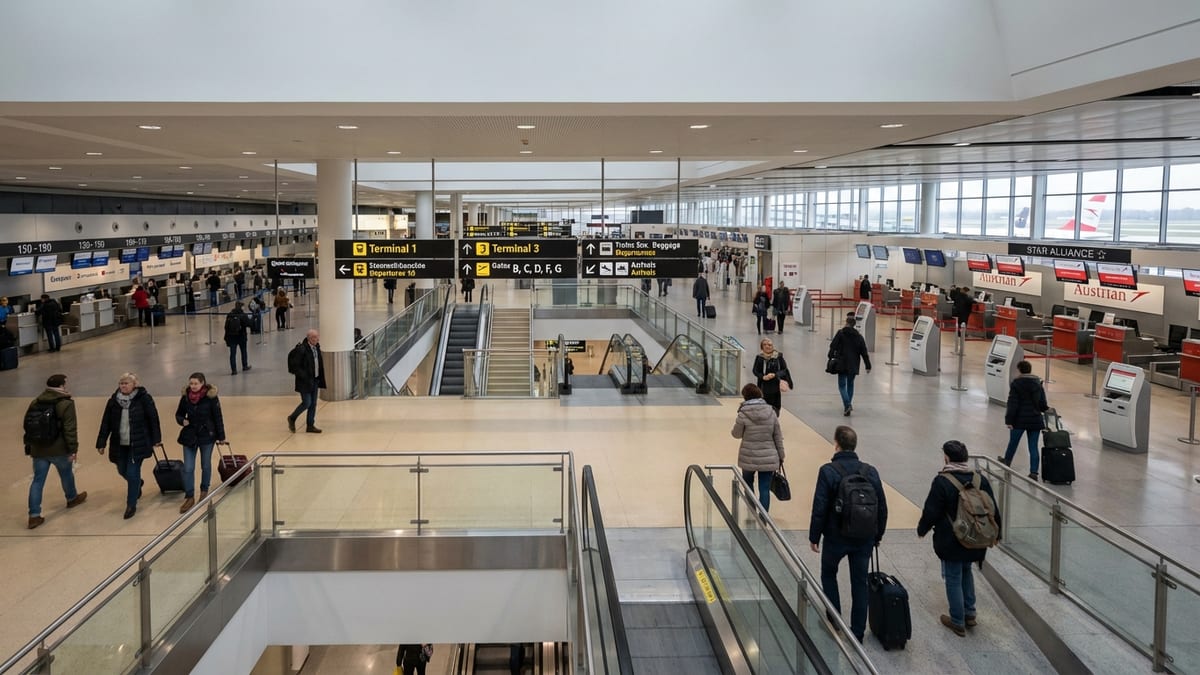
Vienna International Airport is essentially one interconnected terminal complex, with several check in halls and multiple gate piers. Terminals 1, 2 and 3 sit side by side in a single building. Opposite T1, across a road, is the small stand alone Terminal 1A used for additional check in capacity. Passengers do not need trains or buses to move between T1 and T3. Everything is within walking distance, connected by indoor corridors and escalators.
The terminal complex feeds into five main gate areas, labeled B, C, D, F and G. B and C gates handle Schengen flights on the western side of the airport, while D gates accommodate non Schengen flights on the same side. On the eastern side, F gates are used for Schengen services and G gates for non Schengen destinations. The central arrivals hall for the whole airport is located in the Terminal 3 section, so regardless of where you check in, you will generally emerge into this shared arrivals area after landing.
Check in operations are officially grouped into Terminals 1, 1A and 3. Terminal 2 has been extensively refurbished and now functions mostly as a connector and arrivals zone rather than a primary check in hall. That is one reason many travelers feel that Vienna has “no real Terminal 2” or that it appears mainly on maps and wayfinding screens as a transit area linking the older and newer parts of the building.
Crucially, Vienna Airport is designed around vertical separation. Instead of long horizontal transfers between distant buildings, you often move one or two levels up or down by escalator. Departure levels, arrivals halls and gate levels are stacked, which keeps walking distances short and makes tight connections more realistic than at many larger European hubs.
Terminal 1: Airlines, Check In and Gates
Terminal 1 is one of the main check in areas for non Star Alliance airlines and a range of European and leisure carriers. It is physically integrated with the same main building as Terminal 3, and on the departures level it extends towards the west, close to the B, C and D gate piers. Check in counters in T1 are typically numbered in the 150s to 190s and are used by oneworld and SkyTeam airlines, a selection of independents and some low cost brands.
From Terminal 1, passengers can reach the B and C gate areas for Schengen flights, as well as D gates for non Schengen services. Many short haul European routes on carriers such as British Airways, Air France, KLM, Iberia, Aer Lingus, Eurowings, Finnair and Norwegian typically use T1 for check in, although assignments can change and you should always confirm on your boarding pass and the airport screens on the day of travel.
The departures level of Terminal 1 hosts a full range of services, including airline ticket desks, information counters, shops, cafes and security access points that lead through to the west side gates. Several lounges are located in this part of the airport, including contract lounges and some airline operated spaces that serve non Schengen and Schengen passengers. Since Vienna’s terminals share the same airside zone, once you have cleared security near T1 you can walk to many facilities also used by T3 passengers and vice versa.
On the arrivals side, baggage reclaim for flights handled through the western gates still feeds into the common arrivals hall in the central area of the building. Even if you departed from T1, you will generally be guided after landing towards the central arrivals zone in the T3 sector, where ground transport, car rental and onward rail and bus connections are concentrated.
Terminal 1A: The Satellite Check In Hall
Although the focus of this guide is Terminals 1, 2 and 3, it is important to understand Terminal 1A because it shares many functions with T1. Terminal 1A is a smaller, stand alone building located just opposite T1 across a short roadway. It was originally built as a temporary facility to absorb growing passenger numbers and has since been modernized to handle a mix of leisure and scheduled carriers.
Terminal 1A is used entirely for check in and baggage drop. It does not have its own gate pier. After you check in at T1A, you will proceed through security and then walk back into the main terminal complex to reach your departure gate in the B, C, D, F or G areas. Airlines using this facility often include low cost operators such as easyJet and Jet2, as well as leisure and charter airlines, some Middle Eastern and North African carriers, and certain seasonal services.
The hall in T1A is relatively compact, with a series of check in counters that are generally numbered in the 110s and 120s. Facilities here are more functional than luxurious. You can expect basic services like information desks and vending machines, but most shops, restaurants and lounges are located airside in the main building after security. For that reason, many travelers prefer to finalize check in in T1A and then move promptly across to the central terminal to take advantage of a wider choice of amenities.
Wayfinding between T1A and the main building is straightforward. After dropping your bags at T1A, you follow clearly signposted paths across the forecourt into the departures level of T1 or T3. The walking time is usually just a few minutes, even with luggage. Because T1A is primarily about capacity, its use can be adjusted seasonally, so it is always best to check your airline’s latest instructions before you travel.
Terminal 2: The Modernized Connector
Terminal 2 is the oldest of the three main terminal structures, with origins in the 1960s and substantial extension in the 1990s. For many years it was the airport’s primary passenger terminal. With the opening of Terminal 3, however, its role shifted and its original check in function was largely retired. More recently, Vienna Airport has invested in an extensive modernization of T2, renewing its interiors and integrating it more fully into the overall terminal concept.
Today, Terminal 2 acts primarily as a connector and part of the central arrivals and processing area. It links the western T1 region with the newer T3 and the eastern pier. In practice, that means you may walk through spaces that are technically part of T2 on your way between gates, or when making transfers between Schengen and non Schengen zones, without necessarily realizing you are in a separate named terminal.
The renewed T2 includes upgraded commercial areas, refreshed baggage reclaim facilities and improved circulation spaces. For passengers, the key takeaway is that security screening for departures is concentrated in the main checkpoints associated with T1 and T3. You typically will not see Terminal 2 labeled as a distinct check in option on your boarding pass. Instead, T2 adds capacity and comfort in the background, smoothing flows between gate areas and supporting the airport’s increasingly important transfer function.
If you have a connection at Vienna, especially between a western gate (B, C or D) and an eastern one (F or G), you are likely to pass through or near the T2 section on an upper or lower level. Signage is clear and bilingual in German and English, and the walking routes are direct. Because the airport is under one continuous roof, you will not need to exit and reenter security when moving between terminals, provided you remain airside and follow the transfer signs.
Terminal 3: The Austrian and Star Alliance Hub
Terminal 3 is the newest and most prominent part of Vienna International Airport. Often referred to as the Austrian or Star Alliance terminal, T3 serves as the main base for Austrian Airlines, Lufthansa Group carriers and many Star Alliance partners. It has also become the check in home for several long haul airlines, including some major Gulf and Asian carriers, reflecting Vienna’s role as a growing intercontinental gateway.
The check in halls in T3 are expansive, bright and arranged in islands with generous self service kiosk capacity. Counters in this area are usually numbered in the 300s. Austrian Airlines and fellow Lufthansa Group airlines such as Lufthansa, Swiss and Brussels Airlines have their main desks here, alongside Star Alliance partners and selected non alliance carriers. For passengers, this concentration of airlines creates a one stop zone where connecting between flights on the same alliance is straightforward.
From Terminal 3, you access the eastern piers with F and G gates. F gates typically handle Schengen flights, including a large share of Austrian’s European network. G gates serve non Schengen destinations, including intercontinental departures to North America, Asia and the Middle East. A cluster of Austrian and Star Alliance lounges is located in this sector, positioned to serve both Schengen and non Schengen passengers before they proceed to their respective passport control points and boarding areas.
Terminal 3 also hosts the central arrivals hall for the airport. After landing, passengers from both the western and eastern piers are funneled towards this shared arrivals zone at the lower level of T3. Here you will find baggage carousels, customs, ground transport information, car rental desks, a supermarket and a good choice of shops and cafes. This design means that regardless of the check in terminal used for your departure, your arrival experience at Vienna is largely standardized around the T3 arrivals facilities.
Schengen vs Non Schengen: Understanding the Gate Letters
One of the most useful aspects of Vienna Airport’s layout is that the gate letter immediately tells you whether you are departing from the Schengen or non Schengen zone. Gates B, C and F serve Schengen destinations, while D and G gates are used for non Schengen flights. This split determines whether you will pass through passport control before boarding, which lounges you can access and how easy it is to move between different gate areas once airside.
On the western side of the terminal, B and C gates are dedicated to Schengen operations. Travelers flying within the Schengen Area often depart from these gates after clearing security near Terminal 1. D gates on the same side handle non Schengen flights, including some long haul services that require additional document checks. For example, certain North American departures may still operate from D gates, even if check in took place in Terminal 3, because of the specific requirements for secured gate areas.
On the eastern side, linked directly with Terminal 3, F gates manage Schengen flights and G gates non Schengen services. Austrian Airlines and its partners use these piers heavily, especially for connections between European and long haul sectors. Once you have passed through passport control into the non Schengen G zone, movement back to the Schengen side is restricted, so it is important to choose your lounge and shops before you cross that border if you are unsure.
Because Vienna is a relatively compact hub, transfer times can be short provided you move promptly and follow the signage. If you are connecting from a Schengen to a non Schengen flight, or vice versa, build in a few extra minutes to clear passport control. Security and passport check facilities have been expanded in recent years, but queues still fluctuate during peak banks of departures early in the morning and late afternoon.
Check In, Security and Transfers Between Terminals
Check in at Vienna generally opens several hours before departure, with the airport itself advising passengers to arrive at least two hours early for short haul flights and three hours for longer intercontinental services. Your airline determines which terminal and check in zone you use. This information appears on your boarding pass and booking confirmation, and is repeated on the terminal assignment screens in the departures halls.
In Terminal 1 and Terminal 3, you will find both staffed counters and self service kiosks where you can print boarding passes and baggage tags before proceeding to bag drop desks. Passengers using Terminal 1A will usually check in at staffed counters, though some self service options may be available depending on the airline. Online and mobile check in are widely supported, so many travelers arrive at the airport with boarding passes already on their phones and simply need to drop bags and proceed through security.
Security screening is concentrated in a small number of central checkpoints associated with the main departures levels. Passengers departing from T1 or T1A typically pass through the western security zone, while those from T3 use the large central checkpoint that feeds towards the F and G piers and also links back into the rest of the terminal. Once through security, you are essentially in a common departures area that stretches across the building, with shops, food outlets and lounges distributed along the route to the gates.
For connecting passengers, transfers between T1, T2 and T3 are done entirely on foot and usually within the secure airside area. Clear signage directs you along the shortest route to your next gate, sometimes involving a change of level via escalator or lifts. If your connection requires a change between Schengen and non Schengen zones, you will pass through passport control checkpoints, which are located at the boundaries between the B/C/F areas and the D/G sectors. Information screens throughout the concourses display estimated walking times to key gate clusters, which can help you judge whether to stop briefly for a coffee or head straight to boarding.
Practical Tips for Using T1, T2 and T3
For most travelers, the biggest source of confusion at Vienna is the apparent mismatch between the number of named terminals and the reality of a continuous building. The simple way to think about it is that T1, T1A and T3 are check in labels, while the B, C, D, F and G letters tell you where you will actually board the aircraft. Terminal 2 sits quietly in the background as a modernized link and part of the shared arrivals and circulation space.
If you are flying with Austrian Airlines, another Lufthansa Group carrier or a Star Alliance airline, assume that you will check in at Terminal 3 unless your airline explicitly instructs otherwise. If you are traveling on a low cost, leisure or non aligned carrier, check your booking information carefully to see whether you are assigned to Terminal 1 or Terminal 1A. Building in a few extra minutes to navigate between T1A and the main building is wise, especially during busy holiday periods.
When planning connections, pay close attention to your arrival and departure gate letters. A connection from an F gate to a G gate, both on the eastern side, will usually be faster than one that crosses from B or C on the west to G on the east, which may involve a longer walk and an additional passport check. That said, Vienna’s design as a compact, vertically layered hub with one central building generally keeps walking times reasonable compared with larger multi terminal airports.
Finally, remember that shops, cafes and lounges are spread fairly evenly through the airside areas, but the widest selection is near the central spine of the building and around the entrances to the major gate piers. If your gate is at the far end of a concourse, consider stopping for refreshments slightly earlier in your walk, then proceeding towards the gate once boarding time approaches. Public address announcements and screens will alert you to any last minute gate changes, which are not uncommon during busy peaks.
The Takeaway
Vienna International Airport’s mix of Terminals 1, 2 and 3 can appear complicated on paper, but on the ground it operates more like a single, well connected terminal with multiple check in halls and gate zones. Terminal 1 and the satellite Terminal 1A primarily serve non Star Alliance and leisure carriers, while Terminal 3 is the flagship Austrian and Star Alliance hub with direct access to the F and G gates and the central arrivals hall. Terminal 2, once the main terminal, has been transformed into a modern connector that supports passenger flows rather than acting as a standalone check in point.
By focusing on three key pieces of information your check in terminal (T1, T1A or T3), your gate letter (B, C, D, F or G) and whether your destination is within or outside the Schengen Area you can quickly make sense of the airport layout. Transfers between terminals are on foot, security is centralized and the vertical design keeps distances manageable. For most journeys, that translates into smoother connections and a less stressful start or end to your time in Vienna.
FAQ
Q1. Which terminal will I use for my flight from Vienna?
Your terminal depends on the airline. Austrian Airlines, Lufthansa Group and most Star Alliance carriers generally use Terminal 3, while many other European and leisure airlines use Terminal 1 or Terminal 1A. Always check your booking confirmation and airport displays on the day of travel.
Q2. What is the difference between Terminal 1 and Terminal 1A?
Terminal 1 is part of the main building and has direct links to security and the B, C and D gates. Terminal 1A is a smaller stand alone check in hall across the forecourt, used heavily by low cost and leisure carriers. After checking in at T1A, you walk back into the main building for security and boarding.
Q3. Is Terminal 2 still in use at Vienna Airport?
Yes, Terminal 2 is still part of the airport, but its role has changed. It no longer functions as a primary check in hall. Instead, it has been refurbished and now serves mainly as a connector and part of the central arrivals and circulation space between the older and newer terminal sections.
Q4. How do I transfer between Terminals 1, 2 and 3?
You transfer on foot within a single interconnected building. Clear signs direct you between the different terminal areas and gate piers. Escalators and lifts link the various levels, and most connections can be made without leaving the secure airside area.
Q5. How can I tell if my flight is Schengen or non Schengen?
The gate letter is a good indicator. Gates B, C and F handle Schengen flights within the Schengen Area. Gates D and G handle non Schengen services to destinations outside the Schengen zone. Your boarding pass and booking details will also specify whether passport control is required.
Q6. How early should I arrive at Vienna Airport for check in?
As a rule of thumb, plan to arrive at least two hours before departure for European and medium haul flights, and at least three hours in advance for long haul or intercontinental flights. During peak holiday periods or if you need special services, adding extra time is sensible.
Q7. Are there good food and shopping options in all terminals?
Yes. The main concentration of shops and restaurants is in the central airside zones that link Terminals 1, 2 and 3, as well as near the entrances to the major gate piers. While Terminal 1A itself is more basic, once you have passed security and entered the main departures area you will find a broad range of dining and shopping choices.
Q8. Where do I arrive if I land at Vienna, regardless of departure terminal?
Most arriving passengers, whether their flight uses the western or eastern piers, are guided to the central arrivals hall located in the Terminal 3 section. There you will find baggage reclaim, customs, ground transport links, car rental desks and various shops and services.
Q9. Is Vienna Airport easy to use for tight connections?
Vienna is known for relatively short minimum connection times because all gates and terminals sit under one roof and are linked by direct walking routes. That said, if your connection involves changing between Schengen and non Schengen zones, you will need to allow extra minutes for passport control and possible queues.
Q10. What should I do if I am unsure about my terminal or gate at Vienna?
If in doubt, start by checking the terminal information on your boarding pass and then confirm on the airport’s flight information screens when you arrive. Information desks are available in each check in hall and in the main concourses. Staff can point you towards the correct terminal area and estimate how long it will take to walk to your gate.