


Tokyo’s Narita International Airport is often a traveler’s first real contact with Japan. After a long flight, what you need most are the basics: fast WiFi, a working phone, cash in your pocket, somewhere safe to leave your bags and a hot shower. Narita delivers all of these, but the options can be confusing if you are jet-lagged and new to Japan. This guide walks you step by step through the key services at Narita as they work today, with concrete examples that will help you move from the gate to the city with confidence.
Get the latest updates straight to your inbox!
Getting Online: Free WiFi and How to Use It
Narita Airport provides free WiFi in all three terminals, including arrival halls, departure areas and most seating zones. The main network is typically labeled along the lines of “FreeWiFi-NARITA” on your device. The connection is designed for quick access rather than heavy streaming, but for most travelers it is fast enough to download email, message family, call a rideshare, or install an eSIM app.
Connecting is straightforward. After selecting the airport network, your browser will open a login page where you accept the terms of use. You do not usually need to register an email address or phone number, which makes it particularly convenient for first-time visitors who do not yet have Japanese mobile service. Connections are often time-limited, but you can usually reconnect with a single tap if your session expires.
In practice, WiFi speeds can vary depending on the time of day and how busy the terminal is. Around late morning and evening banked international arrivals, you might notice slower performance near the main arrival lobbies. If you need a more stable connection for video calls or heavy downloads, try moving to a quieter seating area in the terminal, such as the ends of the concourses or near less-used boarding gates, where fewer people are sharing the same access point.
For travelers with long layovers or remote work needs, Narita has business lounges, airline lounges and dedicated workspaces that offer faster WiFi and power outlets at every seat. Access may require a same-day boarding pass and, in the case of independent lounges, a paid entry fee, but the improved connection and comfortable seating can be worth it if you are planning to spend several hours online.
SIM Cards, eSIMs and Pocket WiFi at Narita
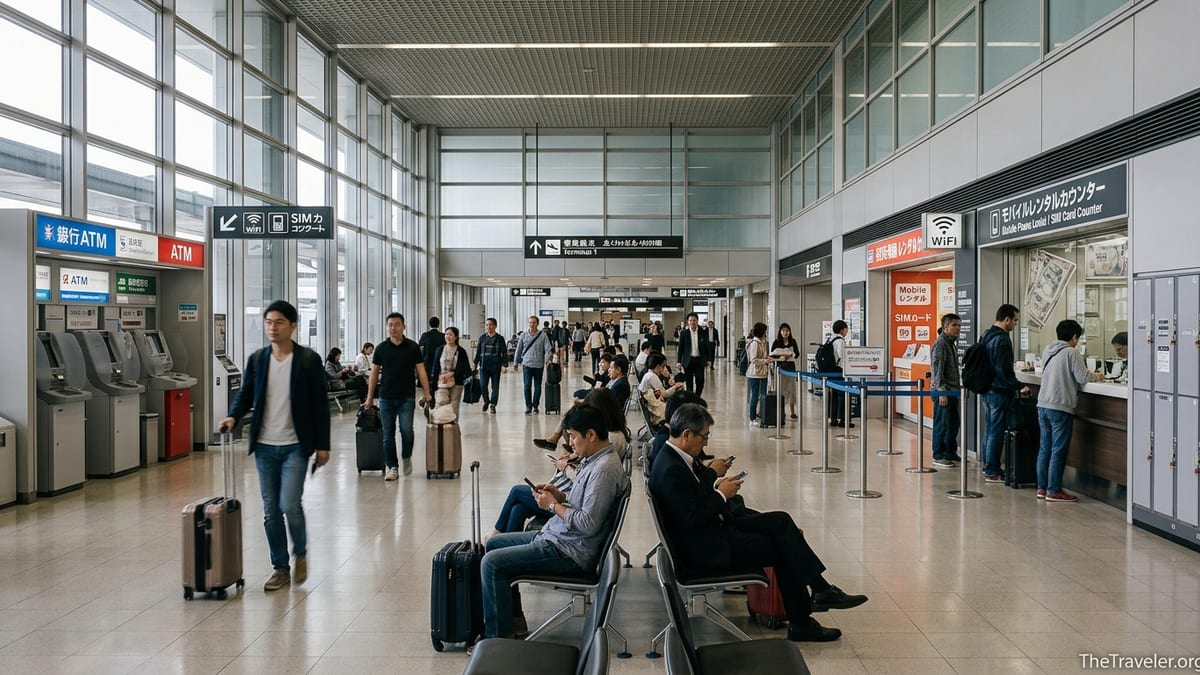
If you want mobile data beyond the airport, Narita is one of the easiest places in Japan to get connected. Before security in the arrival areas of Terminals 1 and 2, you will find counters and vending machines operated by companies such as JAL ABC, SoftBank Global Rental, global WiFi providers and local agencies. These offer physical SIM cards, pocket WiFi routers and sometimes eSIM activation support. Typical prepaid data SIMs sold at the airport target short-term visitors, with popular options for stays of around 7 to 30 days.
As an example, a common product is a data-only prepaid SIM that offers around 3 to 5 GB of high-speed data over a week, or larger packages with 15 to 30 GB for a month. Prices fluctuate over time and by provider, but airport SIMs are usually a bit more expensive than similar products bought in central Tokyo electronics stores. In return, you get English-speaking staff who can check your phone’s compatibility, insert the SIM and confirm that your connection is working before you leave the counter.
Pocket WiFi rental is another popular choice, especially for families or small groups. Providers at Narita typically rent small battery-powered routers that can connect multiple devices at once, such as two phones and a laptop. Daily rental prices vary by data allowance and company, but many visitors choose unlimited or high-capacity plans so they can stream maps and videos without worrying about usage. Collection and return are simple: you pick up the device at the provider’s airport counter on arrival and drop it back at the same counter or a return box before departure.
Some travelers now skip physical SIMs and opt for eSIMs purchased online before their trip. If your phone supports eSIM, you can install a Japan data plan from an international provider at home, then use Narita’s free WiFi on arrival to activate it. This avoids queues at airport counters altogether. However, if anything goes wrong with activation or you are unsure about settings such as APN configuration, the staffed SIM and WiFi desks in the arrivals area are still the fastest way to fix the problem.
ATMs, Currency Exchange and Paying in Japan
Although Japan increasingly accepts cards and mobile payments, having some yen in your wallet when you leave Narita still helps. All three terminals have a mix of bank-operated ATMs and currency exchange counters operated by companies such as Chiba Bank, Keiyo Bank, Travelex and other local agencies. These are located both before and after security in the arrival and departure levels, so you can get cash whether you are entering or leaving the country.
For many international travelers, ATMs provide better value than cash exchange desks. Machines operated by major Japanese banks such as Seven Bank and Japan Post Bank typically accept foreign cards from networks like Visa, Mastercard and others. Limits per transaction can vary by machine and by your home bank’s rules, but withdrawing around the equivalent of a few hundred US dollars in yen is common. The exchange rate will typically track market rates more closely than the board rates at currency counters, though your home bank may add its own foreign transaction fees.
If you prefer to exchange cash, Narita’s currency counters cover a broad range of major currencies. Rates are generally competitive for an airport, but you will almost always get a slightly better overall deal by withdrawing yen from a Japanese ATM instead of converting bills. One practical strategy is to exchange a small amount at the first counter you see, enough for train fare and a snack, then rely on ATMs in the city for larger amounts once you are settled in.
When using ATMs at Narita, pay close attention to the prompts on the screen. Some machines and payment terminals offer dynamic currency conversion, asking whether you want to be charged in your home currency instead of yen. In most cases, choosing to be billed in yen leads to a better rate, because your home bank handles the conversion rather than a third-party operator building extra margin into the rate. Take a moment to read the options carefully, especially if you are tired from a long-haul flight.
Luggage Lockers and Baggage Storage
Many travelers want to drop their bags and explore Tokyo light, whether for a same-day city visit or a multi-day stopover. Narita supports this with extensive luggage storage options throughout all three terminals. There are rows of self-service coin lockers in public areas as well as staffed baggage storage counters run by companies such as JAL ABC and Yamato Transport, typically located near the arrivals lobbies and terminal walkways.
Coin lockers come in several sizes, from compact boxes for backpacks to larger cabinets that fit standard checked suitcases. Prices are generally charged per 24-hour period and increase with locker size; large lockers suitable for typical suitcases often cost in the range of several hundred yen per day. You pay by inserting coins or using a rechargeable transport card such as Suica or PASMO on compatible machines. The locker prints a ticket or uses a code that you will need when you return, so keep it somewhere separate from the bag you are storing.
For very large items such as oversized suitcases, sports equipment or multiple bags, the staffed counters are more flexible than the lockers. At these desks, attendants tag and store your items in a secure back room and charge a per-item daily fee, usually scaled by size and duration. Travelers commonly use these services for multi-day storage during side trips. For example, someone flying into Narita for a five-day stopover might store two large suitcases at a Terminal 3 storage counter while traveling into Tokyo with only a small carry-on.
One practical tip is to have a backup plan in case lockers are full, which can happen during peak holiday periods. If you walk through a terminal and find that every locker is occupied, go directly to the nearest baggage storage counter and ask about availability. Staff can usually find space, and while the per-day cost might be a bit higher than a self-service locker, the extra flexibility and security are often worth it for peace of mind.
Showers, Rest Areas and Other Comfort Services
After a long flight, the chance to take a shower before heading into Tokyo can transform your arrival experience. Narita offers shower rooms in multiple terminals, typically located landside near arrival halls or in areas that are accessible to both departing and arriving passengers. These facilities are designed to be used by travelers on short layovers or anyone wanting to freshen up before continuing their journey.
Shower rooms are normally rented in blocks of time, for example 30 minutes, and include basics such as towels, body soap and shampoo. Some facilities sell or lend additional amenities like toothbrush sets and razors. Payment is taken at the reception desk or at an automated kiosk, and the staff monitor occupancy to keep waiting times reasonable. During busy late-afternoon and evening periods, you may need to wait a short while, so it can be wise to head straight for the shower area before stopping for a long meal or shopping round.
For travelers with overnight layovers or very early flights, Narita also provides rest zones, day rooms and access to nearby capsule hotels. One well-known example near Terminal 2 is a capsule hotel concept offering compact sleeping pods, showers and storage so you can rest without leaving the airport complex. This is particularly useful if your flight lands late at night, public transport options into Tokyo are limited, and you prefer not to pay for a full hotel room for just a few hours.
Throughout the terminals you will find comfortable seating clusters, quiet corners and sometimes reclining chairs near less busy gates. These areas, combined with the free WiFi and easy access to vending machines, make Narita more comfortable than many airports for long waits. Travelers with children can also take advantage of kids’ play spaces in certain zones, which provide room to move around and burn off energy between flights.
Practical Tips for Moving Between Terminals and Into Tokyo
Narita’s three terminals are connected by free shuttle buses and pedestrian walkways, and many essential services are duplicated in more than one location. For instance, if the SIM card counters in one terminal are crowded, staff may direct you to a quieter counter or vending machine in another terminal. Shuttle buses are clearly marked and typically run every few minutes, so transferring between terminals to find a specific service is straightforward.
When planning your onward journey, keep in mind that most visitors take either a dedicated airport express train, a slower but cheaper commuter service, or an airport limousine bus into central Tokyo. These transport options can usually be paid with IC cards, regular train tickets or credit cards at the station and bus counters. Having a small amount of cash from an ATM or exchange desk is still useful for smaller purchases such as drinks from vending machines or snacks at convenience stores on the platform.
If you intend to buy regional rail passes or city passes that bundle transport and attraction discounts, the arrival hall ticket counters and travel service centers in Terminals 1 and 2 are critical stops. Staff there can sometimes handle everything at once: setting up your IC card, issuing a rail pass, selling a data SIM and giving printed maps that explain which platform to use. Organizing as much as possible while still inside the terminal, while you have access to English-speaking staff and clear signage, generally makes the rest of your journey smoother.
For travelers who are anxious about navigating Tokyo’s transport network on day one, another option is to book a hotel near Narita for the first night, using the airport’s hotel information counters or online reservations. Many nearby hotels provide free shuttles from the terminals, and staying close to the airport can be especially appealing if you arrive late in the evening or with young children who may not enjoy a long train ride immediately after landing.
The Takeaway
Narita International Airport is more than just a gateway to Tokyo; it is a well-equipped hub where you can solve most of your early travel challenges in one place. From free WiFi that lets you message home within minutes of landing, to a full range of SIM cards, pocket WiFi rentals and eSIM options, staying connected is straightforward. The airport’s dense network of ATMs and currency exchange counters makes getting yen simple, while luggage lockers and staffed storage counters give you the freedom to explore Japan without hauling heavy bags.
Comfort services such as showers, rest areas, and nearby capsule hotels soften the edges of long flights and awkward layover schedules. Meanwhile, clear signage, friendly staff and frequent terminal shuttles tie everything together, helping you move smoothly between arrival gates, service counters and onward transport. Take a few calm minutes after landing to visit the services that matter most to you, whether that is cash, connectivity, baggage storage or a hot shower, and you will step out of Narita ready to enjoy the rest of your journey in Japan.
FAQ
Q1. Is WiFi at Narita Airport really free and reliable?
Yes, Narita offers free WiFi throughout all terminals. It is generally reliable for messaging, email and light browsing, though speeds can slow during peak arrival times.
Q2. Can I buy a physical SIM card on arrival at Narita?
Yes, there are multiple counters and vending machines in the arrivals areas of Terminals 1 and 2 selling prepaid data SIMs designed for short-term visitors.
Q3. Is a pocket WiFi router better than a SIM card in Japan?
It depends on your situation. Pocket WiFi is ideal for groups or travelers with several devices, while a SIM or eSIM suits solo travelers with an unlocked phone.
Q4. Do ATMs at Narita accept foreign bank cards?
Most major bank ATMs at Narita accept international cards from networks such as Visa and Mastercard, though your home bank’s withdrawal and fee rules will still apply.
Q5. Is it cheaper to exchange cash or use an ATM at Narita?
ATMs usually provide rates closer to market levels, but may include bank fees. Currency counters are convenient for cash exchanges but often have slightly less favorable rates.
Q6. Are there coin lockers in every terminal at Narita?
Yes, all three terminals have self-service coin lockers, with various sizes suitable for daypacks up to standard checked suitcases, charged per 24-hour period.
Q7. How long can I store luggage at Narita Airport?
Coin lockers are typically intended for short-term use of up to a few days, while staffed luggage storage counters can store bags for longer periods for a daily fee.
Q8. Can I take a shower at Narita after a long flight?
Yes, several shower facilities and day rooms are available in the terminals, offering private shower stalls for a set time, usually including basic amenities.
Q9. Is it easy to move between Narita’s terminals to find services?
Yes, free shuttle buses and walkways connect Terminals 1, 2 and 3, and many essential services such as ATMs, SIM counters and lockers are available in more than one terminal.
Q10. Do I need cash immediately, or can I rely on cards when leaving Narita?
You can often pay major transport fares and larger purchases with cards, but having some yen from an ATM or exchange desk is helpful for small shops and vending machines.