


The Temple of Olympian Zeus is one of Athens’ most rewarding photo locations: immense Corinthian columns, an open skyline and a perfect sightline to the Acropolis. Yet many visitors leave with flat, backlit images that do not do the site justice. This guide breaks down exactly where to stand, when to go and how to frame the ruins so you bring home photos that match what you felt on the ground.
Get the latest updates straight to your inbox!
Understanding the Site: Layout, Light and Access
The Temple of Olympian Zeus, also known as the Olympieion, sits in a broad open enclosure just southeast of the Acropolis. Only 15 of the original 104 columns remain standing, grouped mainly at the southeast corner, with one dramatic column lying on its side where a storm toppled it in the 19th century. The openness of the site means you have long sightlines in almost every direction, including a clear view up to the Acropolis ridge.
The main entrance for visitors is on Vasilissis Olgas Avenue, opposite the National Garden. From the ticket gate you walk along a straight gravel path toward the standing columns. This axis is your first classic photo angle, but the most interesting compositions are usually found if you continue around the perimeter path that loops the monument. Plan on 30 to 60 minutes inside if you want to explore several viewpoints rather than just the standard front-on shot.
Opening hours vary by season, but in recent years the pattern has been roughly 8:00 to 19:00 in summer and 8:00 to mid-afternoon in winter, with last entry about 30 minutes before closing. Exact times can shift with daylight and cultural events, so always check the latest official schedule shortly before your visit. Early and late slots not only bring softer light but also thinner crowds, which makes it much easier to compose clean frames around the columns.
Because there is little shade inside the enclosure, midday in July and August can be intensely bright and hot, with harsh overhead sun. For both comfort and photography, treating Olympieion as an early-morning or late-afternoon stop works far better. Many travelers combine it with a walk through the National Garden or a visit to the nearby Panathenaic Stadium so they can time the light rather than visiting at random in the middle of the day.
Best Angles Inside the Site: Columns and Acropolis Backdrop
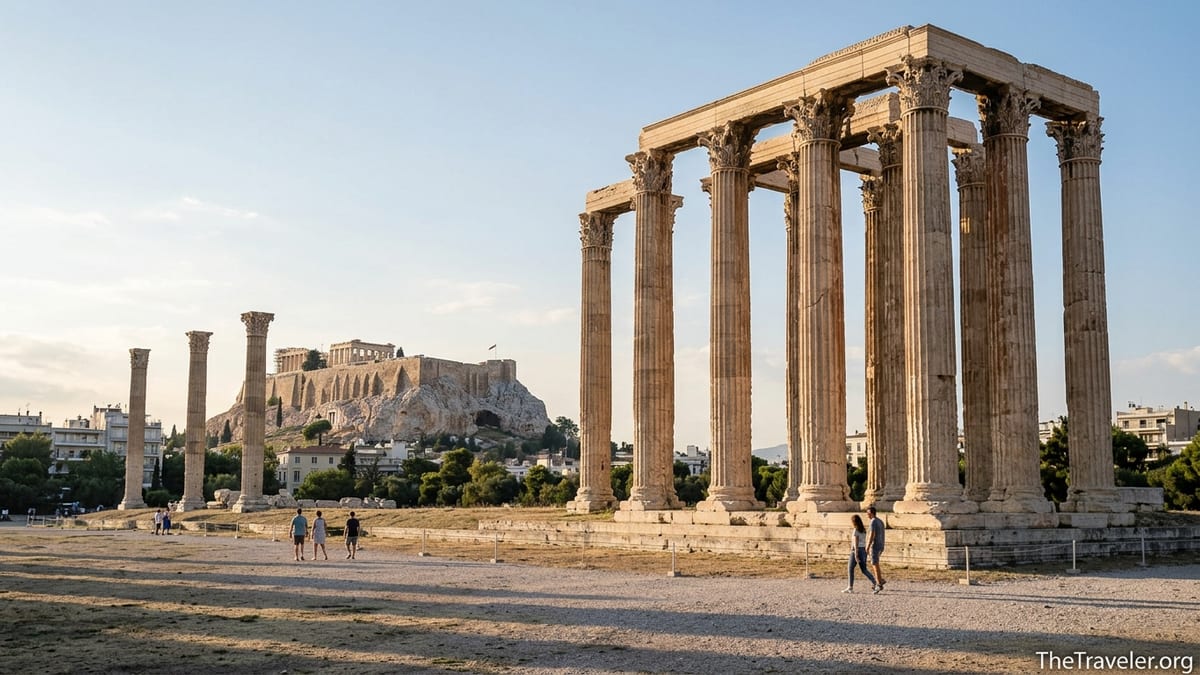
Once you pass the entrance gate, walk straight ahead until the standing columns fill your frame, then turn slightly to your left. From here, facing roughly northwest, you can line up the columns so the Acropolis sits on the distant ridge behind them. This is the “postcard” Olympus–Acropolis combination that appears in many tourism brochures. To emphasize the scale, squat slightly and tilt your camera upward so the columns tower over the Acropolis rather than competing with it on the horizon.
Continuing around the path clockwise toward the southeast corner gives you what many local photographers consider the best all-purpose angle. Standing near the far fence and shooting back toward the northwest, you see the full cluster of 13 standing columns with the Parthenon clearly visible above the city. On a clear day, the beige limestone of the Acropolis contrasts with the creamy Pentelic marble of the columns, creating a layered effect from foreground ruins to distant hilltop temple.
Near the southern side of the compound, the fallen column becomes your main subject. From ground level, kneel at the base of the toppled shaft and frame along its full length so each circular drum stacks into the next. With a standard zoom around 35 to 50 millimeters, this produces a powerful leading line drawing the eye into the image. If you step slightly to one side, you can still keep a few standing columns in the background for context, which works particularly well for detail-focused travel photography.
On the western side of the site, close to the fence nearest Amalias Avenue, try isolating single columns against the sky. Point your camera upward and use a longer focal length, such as 70 to 100 millimeters, if you have it. This compresses perspective and crops out modern apartment blocks at the edges of the frame, giving an almost timeless view of fluted shafts and ornate Corinthian capitals silhouetted against blue.
Classic Exterior Views: Hadrian’s Arch and Street Perspectives
Some of the most recognizable photos of the Temple of Olympian Zeus are actually taken from outside the paid enclosure. Immediately northwest of the site stands Hadrian’s Arch on Amalias Avenue. If you cross to the pavement opposite the arch and wait for a gap in the traffic, you can frame the temple’s columns through the opening of the arch itself. This creates a natural stone “window” with the ancient columns neatly contained within, a composition used in many guidebooks and Athens postcards.
Because Amalias is a busy artery, timing matters. In the morning, traffic flows heavily toward the city center, while late afternoon and early evening often see congestion in the opposite direction. For a cleaner frame, locals often step onto the small pedestrian refuge islands along the avenue rather than shooting directly from the main pavement. From there, angle your camera slightly so the arch is diagonal rather than perfectly square, which feels more natural and reduces the chance of having a bus slice through your composition.
Another strong exterior angle is from the pedestrian sidewalk along Vasilissis Olgas, close to the entrance gate. From here you can shoot across the fence toward the columns, using the gravel path as a leading line. This is especially useful if you arrive before opening time or if the site is temporarily closed. A moderate zoom lets you crop out the fence and concentrate on the vertical rhythm of the columns with the Acropolis sitting subtly behind them.
For a higher, more expansive view, some travelers book a room or rooftop drink at hotels facing the site, where upper-floor terraces look directly onto the temple complex and, beyond it, the Acropolis. From these elevated vantage points, a 24 to 70 millimeter lens at its wider end lets you capture the entire temple platform, the lines of columns and the Acropolis ridge behind, all in a single frame. This perspective is particularly effective at blue hour, when the site lighting comes on and warm artificial light spills over the marble against a cobalt sky.
Morning vs Afternoon: How Light Changes Your Shots
Light direction at the Temple of Olympian Zeus changes the feel of your photos more than at many other Athens sites because the enclosure is so open. In the early morning, soon after the gates open, the sun is behind you when you face west toward the Acropolis. This front-lighting produces bright, evenly lit columns with pale shadows, ideal for documentary-style images and for phones that struggle with strong contrast. It is also the best time to avoid heat haze and harsh white skies in summer.
By late morning and midday, the sun moves high overhead, flattening the relief of the fluting on the columns and throwing small, hard-edged shadows. The rock of the Acropolis can look washed out, and the stone of the temple may reflect strongly enough to clip highlights in your images. If you have no choice but to visit at this time, consider shooting in black and white or focusing on detail shots of capitals and cracks rather than full-wide views.
In mid to late afternoon, light shifts around so the columns are side-lit when you face north toward the Acropolis. This is often the most photogenic window of the day. The grooves in the marble catch the sun, emphasizing texture, while long shadows carve out depth across the temple platform. Locally, photographers often target a 2 to 4 p.m. arrival in spring and autumn so they can move around the site as the sun lowers, catching several different moods in one visit.
Toward sunset, especially in autumn and winter when the sun sets earlier and closer to the southwest, the marble can turn a warm honey color. The risk is that the Acropolis behind the temple may fall into deeper shadow, making it less prominent in your frame. To balance this, expose slightly for the highlights on the columns and allow the background to go a touch darker, which draws attention to the foreground architecture while still preserving the outline of the hill and Parthenon.
Wide Shots, Close-Ups and How to Work With Crowds
Because the surviving structure is relatively compact, even a basic phone camera with a standard wide lens can capture sweeping views of the temple. Standing near the northeast or southeast corners of the compound and backing up as far as the fence allows, you can include almost the entire cluster of standing columns, the temple platform and a generous portion of sky. On a mirrorless or DSLR camera, a focal length around 16 to 24 millimeters on a full-frame body is ideal for this kind of all-encompassing shot.
For closer studies, switch your mindset from “big ruin” to “pattern and texture.” Zoom in on details like chipped fluting, the acanthus leaves on the Corinthian capitals or the carved volutes just below the abacus. Many travelers are surprised by how weathered the marble looks up close, with rust-colored streaks from metal clamps and lichen in the crevices. These details tell the story of two millennia of exposure and often make for more original images than yet another wide postcard view.
Crowds can be significant during peak months, especially when cruise-ship buses arrive mid-morning. If you find the base of the columns full of people, raise your angle. Aim upward so only torsos and heads are visible at the very bottom of the frame, or cut them out altogether by tilting the camera higher. Another trick is to step further back and incorporate visitors intentionally as scale figures. A single person in bright clothing walking near the base of a column immediately communicates the size of the structure to anyone viewing your photo later.
On windy days, dust and fine grit may blow across the open site. If you are changing lenses, step behind a wall or turn your back to the wind to avoid particles entering your camera body. For phone photographers, a quick lens wipe before shooting helps reduce haze and fingerprints that become very obvious when you are working against strong light or dark blue skies.
Practical Gear Tips: Phones, Lenses and Simple Settings
Most visitors now rely on smartphones, and the Temple of Olympian Zeus is particularly forgiving for phone photography because you have space to move and no tight interior corners. Use the standard 1x lens for most scenes, which tends to have the best quality. Reserve the ultra-wide option for times when you are standing close to the fence or want to exaggerate the height of the columns by placing them at the edge of the frame. When shooting toward the Acropolis, tap to expose for the columns rather than the bright sky so they do not turn into silhouettes unless that is the effect you want.
If you are carrying a mirrorless or DSLR camera, a basic two-lens kit works well. A wide or standard zoom in the 16 to 50 or 24 to 70 millimeter range covers general views inside the site and the classic arch-and-temple composition on Amalias Avenue. A short telephoto, such as a 70 to 200 millimeter lens, helps you pick out details in the capitals, isolate the Parthenon on the ridge behind the columns or compress distance when shooting from hotel rooftops or the hills surrounding central Athens.
In terms of settings, prioritize aperture control so you can decide how much of the scene is sharp. For sweeping views with both columns and Acropolis in focus, use an aperture around f/8 to f/11 if light allows, and let ISO float in auto mode. For close-ups of fluting or stone texture, a wider aperture like f/4 can gently blur the background while keeping the main subject crisp. Shutter speeds are rarely a problem in bright Greek light, but if you find yourself shooting at dusk, stabilize your camera against the fence or a low wall to avoid motion blur.
Finally, consider bringing a simple polarizing filter if you shoot with interchangeable lenses. On clear days it deepens the blue of the sky and cuts reflections on the marble, making carvings stand out more clearly. Use it sparingly near sunrise and sunset, however, since a strong polarizing effect can unevenly darken parts of the sky when the sun is low and off to the side.
The Takeaway
Photographing the Temple of Olympian Zeus is less about having specialized gear and more about understanding how light, perspective and background work together on this unusually open site. By arriving early or late in the day, spending a little time walking the perimeter path and paying attention to where the Acropolis sits in your frame, you can capture images that feel both iconic and personal.
Whether you shoot wide to include the full sweep of columns, go close for the carved details or seek out the classic arch-framed perspective from Amalias Avenue, the temple rewards patience and experimentation. Give yourself room to roam, watch how shadows lengthen along the fluting and do not be afraid to embrace visitors as part of the story for scale and energy. The result will be a set of photographs that shows Olympieion not only as a famous landmark, but as a living, changing part of the Athenian cityscape.
FAQ
Q1. What is the best time of day to photograph the Temple of Olympian Zeus?
Early morning and mid to late afternoon are generally best. The light is softer, shadows are longer and you avoid the harsh overhead sun and heat of midday, especially in summer.
Q2. Can I capture the Acropolis and the Temple of Olympian Zeus in one shot?
Yes. From inside the site near the southeast corner, face northwest and you can frame the cluster of columns with the Acropolis ridge and Parthenon clearly visible behind them.
Q3. Do I need a zoom lens, or is a phone enough?
A phone is sufficient for most visitors, especially for wide views. A zoom lens helps for close-up details of capitals, isolating individual columns and compressing the scene from rooftops or distant viewpoints.
Q4. Are tripods allowed at the Temple of Olympian Zeus?
Rules can change, but small travel tripods or mini supports are often tolerated for casual use, while larger professional tripods may attract attention from staff. If you plan serious tripod work, it is safer to confirm regulations in advance.
Q5. How long should I plan to stay if I want good photos?
For a quick set of classic angles, 30 minutes can suffice. If you want to explore multiple viewpoints, wait for changing light and work around any crowds, plan on 60 to 90 minutes.
Q6. Is there a good free viewpoint if I do not want to buy a ticket?
Yes. You can photograph the temple through the fence along Vasilissis Olgas Avenue and from around Hadrian’s Arch on Amalias Avenue, both of which offer strong compositions without entering the site.
Q7. What should I wear or bring for a summer photo visit?
Bring water, a hat and sunscreen. There is very little shade within the enclosure, and the bright stone reflects heat and light, making midday visits particularly intense in July and August.
Q8. Can I visit the Temple of Olympian Zeus and the Acropolis on the same day?
Yes. The two sites are within walking distance, and many visitors photograph the temple in the morning, have a break in the National Garden or Plaka, and then climb the Acropolis later in the day.
Q9. Is it possible to take night photos of the temple?
You cannot enter the enclosure after closing, but you can photograph the illuminated columns from outside the fence or from nearby streets and hotel rooftops when the site lighting is on after dark.
Q10. How close can I get to the columns for detail shots?
Access lines may vary, but there is usually a clear perimeter around the temple where visitors can walk quite near the base of the standing columns, close enough to photograph fluting, cracks and decorative capitals with a standard lens.