


Landing in Auckland is how most first-time visitors begin their New Zealand adventure. Auckland Airport (AKL) is the country’s main international gateway and busiest domestic hub, with two separate terminals, multiple transport options into the city, and strict but well-organised border controls. This guide walks you step by step through what to expect and how to move confidently from plane to rental car, campervan, bus, or connecting flight.
Get the latest updates straight to your inbox!
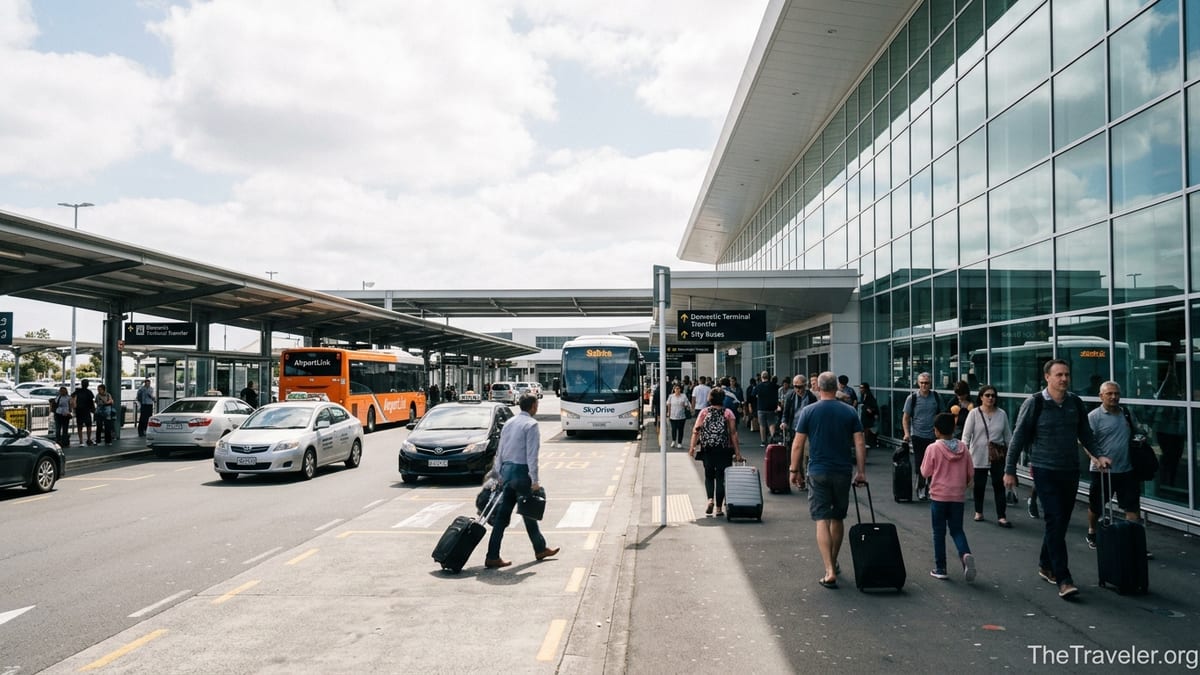
Understanding Auckland Airport’s Layout: Domestic vs International
Auckland Airport has two main terminals: the International Terminal, where almost all long-haul flights arrive and depart, and the Domestic Terminal, used primarily by Air New Zealand and a few regional airlines for flights within New Zealand. The terminals sit about 500 metres apart, roughly a 10-minute walk at a relaxed pace, or a short ride on the free transfer bus that loops between them. For a first-time visitor, simply knowing there are two separate buildings can remove a lot of stress when planning connections.
Most international flights from North America, Asia, and Europe will arrive at the International Terminal. If Auckland is your final stop, you will collect your bags there, clear customs and biosecurity, and then choose your transport into the city from the ground transport area outside arrivals. If you are connecting on to somewhere like Queenstown, Christchurch, Wellington or a smaller regional airport, your onward flight is almost always from the Domestic Terminal, meaning you will need to factor in time to transfer between terminals after you have cleared the border.
A common real-world scenario is a traveller arriving from Los Angeles at around 6:00 a.m. and connecting to a domestic flight to Queenstown mid-morning. Even if both flights are on the same ticket, you still collect your checked bags in Auckland for customs and biosecurity. Once you exit the secure area you either transfer yourself or, in some cases, use an airline’s domestic transfer desk inside the International Terminal if your bags have been tagged through. Understanding this flow before you fly can make tight connections much less stressful.
Both terminals have cafés, convenience stores and ATMs, but the larger selection of shops and duty free is in the International Terminal. If you have several hours between flights, many travellers choose to walk the green line pathway between terminals, get some fresh air, and grab a coffee from one of the domestic forecourt cafés before their onward flight.
Moving Between Terminals: Walkway and Transfer Bus
Transferring between the International and Domestic terminals at Auckland is straightforward. The simplest option is the signposted green line walkway, an outdoor but mostly level path that connects the two buildings. For a reasonably fit adult with wheeled luggage, the walk typically takes 8 to 10 minutes. The route is clearly marked with green line paint and signs. Many travellers prefer this option in daylight or fine weather because it avoids waiting for a bus and gives them a short leg stretch after a long flight.
For those with heavy bags, mobility issues, bad weather, or travelling with young children, a free terminal transfer bus operates between the two terminals. Buses run frequently during the day and pick up near the front of each terminal, with clear “Terminal Transfer” signage. In practice, the actual ride time is only a few minutes, but you should allow extra time for waiting and loading, particularly in the busy early morning arrival wave when multiple long-haul flights have just landed.
If you are connecting from an international arrival to a domestic Air New Zealand flight on a single ticket, there is sometimes an option to use the airline’s domestic transfer facilities inside the International Terminal. For example, if you are flying Sydney to Auckland to Wellington with Air New Zealand, and your bags are through-checked to Wellington, you may be able to use the domestic transfer desk after customs and then take the shuttle or walk across without needing to re-check at the main domestic counters. The exact process depends on your ticket and airline, so it is worth checking your booking confirmation.
In terms of timing, frequent flyers through Auckland often recommend allowing at least 2 to 3 hours between an international arrival and a separate domestic ticket, to account for queues at passport control, baggage claim, biosecurity, and the terminal transfer. On days when several wide-body aircraft land within a short window, queues can build, while at other times you might breeze through in under an hour. Building a safety margin into your itinerary is the best way to avoid missed connections.
SkyDrive and AirportLink: Public Transport from AKL
For budget-conscious travellers or those who prefer not to drive, Auckland has two main public transport options from the airport: the orange AirportLink bus to the rail network, and the SkyDrive express bus to the central city. Both depart from clearly marked bus stops near the terminals and accept contactless payment or local transport cards.
The AirportLink bus connects Auckland Airport with Puhinui Station and Manukau Bus Station. It runs roughly every 10 minutes from early morning until around 12:40 a.m. on most days. A typical real-world example is a traveller landing at 9:00 a.m., walking out of the International Terminal, following signs to the Transport Hub, and boarding an AirportLink bus within 5 to 15 minutes. At Puhinui Station they transfer to a Southern or Eastern Line train heading into central Auckland’s main downtown station, usually taking another 30 to 40 minutes depending on the line and time of day.
SkyDrive, operated by a private company, runs an express bus between the airport and the SkyCity area in central Auckland, near major hotels and the city’s main intercity bus terminal. Services generally depart about every 30 minutes. The bus is designed for air travellers, so there is dedicated luggage storage, and the onboard announcements are tailored to visitors. For example, a couple arriving on an evening flight from Singapore might choose SkyDrive directly to their hotel near the city centre, avoiding train transfers and simply rolling their suitcases a short distance from the drop-off point.
Both AirportLink and SkyDrive use modern low-floor buses that make boarding easier with wheeled suitcases. You can usually pay using a local AT HOP card or contactless bank card. HOP cards can be purchased from vending machines near Door 4 at the Domestic Terminal and in the transport hub area, or from convenience stores in the arrivals hall. For most visitors staying in Auckland for a few days and planning to use buses and trains, picking up a HOP card on arrival is convenient and can slightly reduce fares compared with cash or single-trip tickets.
In terms of cost, public transport is generally the most economical way to reach the city. While exact fares change periodically, a combined AirportLink plus train journey into downtown often works out significantly cheaper than a taxi or rideshare for solo travellers or couples. However, families of four with large luggage may find the price difference smaller compared to a shared taxi or shuttle, in which case comfort and convenience become the deciding factors.
Taxis, Rideshare, Shuttles and Private Transfers
Auckland Airport has dedicated pick-up areas for taxis, rideshares, and shared shuttles at both terminals. Only licensed taxi and shuttle companies are permitted to pick up from the official ranks directly outside the terminals, although any company can drop off passengers at departures. This system is designed to standardise pricing and ensure that vehicles meet safety and service standards.
At the International Terminal, taxi ranks and shuttle stands are just outside the arrivals area. At the Domestic Terminal, taxi pick-up is usually near Door 4 on the forecourt. Typical taxi fares into central Auckland vary depending on traffic and exact destination, but many operators provide a guideline range from the airport to the CBD. Travellers often report approximate one-way fares that, in normal traffic, can be comparable to a higher-end airport shuttle for one or two people but provide the advantage of door-to-door service to hotels or private addresses.
Rideshare services such as Uber also operate at Auckland Airport, using specific pick-up zones slightly away from the main taxi rank. Signage guides you from the terminal exits to the rideshare area, often under a covered walkway or container-style shelter. A typical experience might be a traveller arriving at the Domestic Terminal, following signs past the smoking area and across the road to the rideshare pick-up point, and waiting 5 to 10 minutes for their car. Pricing can fluctuate with demand, and in peak arrival times like early morning or Friday evenings surge pricing may apply, so checking the fare estimate in the app before confirming is wise.
Shared shuttle services, including multi-stop vans that drop passengers at multiple hotels, can be cost-effective for solo travellers headed into popular tourist areas like the waterfront, Parnell or Ponsonby. These shuttles generally depart once they have enough passengers and can take longer than a taxi due to multiple stops, but the per-person price can work out cheaper than a metered cab. Pre-booked private transfers are another option, particularly for families with young children, bulky equipment such as surfboards, or travellers arriving very late at night who want a driver waiting in the arrivals hall with their name.
Rental Cars and Campervans at Auckland Airport
For many visitors, especially those planning to explore beyond Auckland, picking up a rental car or campervan at the airport is the most practical choice. Most major car hire brands have counters at or near the terminals, while some value-focused local companies operate from off-airport depots connected by free shuttles. When booking, it is worth checking whether your chosen company has an “on-airport” desk with vehicles in the nearby parking structures, or whether you will need to take a short shuttle ride.
At the International Terminal, on-airport rental car desks are located in or near the arrivals hall. Once you have signed the paperwork, staff will direct you to a nearby parking building to collect your vehicle. A typical scenario might be a couple arriving from Vancouver, clearing customs, walking to the rental desk inside the terminal, and being on the road in their compact SUV 30 to 45 minutes later. For off-airport operators, you usually proceed to a designated shuttle pick-up lane near the Transport Hub, where clearly branded vans collect customers at regular intervals.
Campervan rentals are popular with travellers planning multi-week road trips around the North and South Islands. Many well-known campervan brands maintain depots in the airport precinct. After exiting arrivals, you follow signs to off-site shuttles, often in lanes behind the Te Arikinui Pullman hotel, then ride 5 to 10 minutes to the depot. First-time renters should allow up to an hour for check-in, vehicle inspection, paperwork, and a briefing on how to operate onboard systems like gas, water, and electrical hookups.
New Zealand drives on the left, and traffic leaving the airport quickly funnels onto multi-lane highways. If you have just completed a long overnight flight and are not accustomed to left-hand driving, consider staying a night in an airport-area hotel or taking a shuttle into the city and picking up your rental car the following day. Many travellers find that a short recovery period significantly improves safety and confidence when they eventually hit the open road.
Arriving in New Zealand for the First Time: Border, Customs and Biosecurity
New Zealand’s border controls are thorough, particularly when it comes to protecting the country’s unique environment and agricultural sector. When you land at Auckland’s International Terminal, you first proceed to passport control. Many travellers can use automated eGates, which scan biometric passports and take a facial image, before passing through to baggage claim. Others go through staffed immigration counters. How long this stage takes varies from about 10 minutes in quiet periods to considerably longer when several large flights arrive together.
After immigration, you collect your checked luggage and head towards customs and biosecurity screening. Before you arrive in New Zealand you must complete a traveller declaration, which can now be done digitally via an online system or mobile app in the days before your flight. This declaration covers customs questions (for example, whether you are carrying expensive goods over duty-free allowances) and biosecurity questions about food, plant material, outdoor gear, and other risk items. Having this completed in advance usually speeds up processing once you land, as border agencies can pre-screen information digitally.
Biosecurity is taken seriously. Items such as fresh fruit, meat, honey, seeds, and some traditional medicines can be restricted or prohibited. Used hiking boots, camping gear, and sports equipment must be clean and free of soil and organic material. In a typical example, a traveller arriving from Europe with a tent and hiking boots declares them on the form, has them inspected by Ministry for Primary Industries staff, and may have them cleaned on site at their expense if necessary. Failing to declare risk items can lead to on-the-spot fines, which are significant enough to ruin the start of a holiday.
Once you clear customs and biosecurity, you exit into the public arrivals hall, where you will find currency exchange counters, ATMs, visitor information desks, SIM card vendors, and access to ground transport. Processing time from aircraft door to the arrivals hall can range widely, but in recent years infrastructure improvements and widespread use of digital declarations have reduced average processing times. Even so, you should build flexibility into your plans on arrival day, especially if you have onward domestic travel or tours booked.
Practical Tips for First-Time New Zealand Arrivals
There are several simple steps you can take before landing in Auckland to make your first hours in New Zealand smoother. Completing the digital traveller declaration a few days before your flight is one of the most effective. Having screenshots or printouts of key documents such as hotel reservations, onward tickets and travel insurance details readily accessible can also help if border officials have questions about your plans.
Think carefully about what you pack in carry-on versus checked luggage. Keep essential medications, a change of clothes, and any valuable electronics in your cabin bag, but avoid carrying fresh food or plant products that might cause delays at biosecurity. If you are bringing outdoor gear like hiking boots or a tent because you plan to tramp in places such as Tongariro National Park or Fiordland, scrub them thoroughly at home and pack them in an easily accessible part of your suitcase so biosecurity officers can inspect them quickly.
On arrival day, consider how jet lag and fatigue will affect your judgment, especially if you plan to drive. For example, a traveller from New York may have been in transit for more than 20 hours by the time they exit Auckland’s arrivals hall. Booking an airport hotel for the first night, or using SkyDrive or a shuttle into the city instead of driving immediately, is often a safer and more enjoyable choice. Auckland has several hotels within a short walk or shuttle ride of the terminal, ranging from full-service properties connected by covered walkways to more budget-friendly motels a few minutes’ drive away.
Finally, give yourself permission to take things slowly. After you collect your bags and clear the border, find a café, buy a flat white, connect to the free airport Wi-Fi, and take 10 or 15 minutes to orient yourself. Use that time to confirm your transport into the city, double-check your accommodation details, and send a quick message home. Starting your New Zealand journey with a calm, deliberate first hour at Auckland Airport sets the tone for the rest of your trip.
FAQ
Q1. How long should I allow to transfer from an international flight to a domestic flight at Auckland Airport?
For separate tickets, allow at least 2 to 3 hours to clear immigration, collect bags, pass customs and biosecurity, and move between terminals. If both flights are on one ticket, airlines sometimes sell shorter connections, but delays can still happen, so a longer buffer is safer for first-time visitors.
Q2. Do I have to collect my checked baggage in Auckland if I am connecting to another New Zealand city?
Yes, in most cases you must collect your checked bags at Auckland after your international flight in order to clear customs and biosecurity, then re-check them for your domestic flight. The main exception is some through-checked itineraries where an airline transfers bags internally, but you will still follow staff instructions and your bag tags will show whether they are checked through.
Q3. How far apart are the Domestic and International terminals at Auckland Airport?
The terminals are about 500 metres apart, roughly a 10-minute walk along a signposted green line walkway. There is also a free terminal transfer bus that runs regularly between them, which is helpful in bad weather or if you have heavy luggage or mobility issues.
Q4. What is the cheapest way to get from Auckland Airport to the city centre?
Using the AirportLink bus to Puhinui Station and then transferring to a suburban train into downtown is typically the most economical option, especially for solo travellers or couples. It takes a bit longer than a taxi but usually costs substantially less and runs frequently throughout the day.
Q5. Is rideshare like Uber available at Auckland Airport?
Yes, major rideshare services operate at Auckland Airport, with designated pick-up areas separate from the main taxi ranks. After exiting the terminal, follow signs to the rideshare pick-up zone, confirm the zone in your app, and check the fare estimate before you book, as pricing can vary with demand and time of day.
Q6. How strict is New Zealand biosecurity at Auckland Airport?
Biosecurity controls are strict and consistently enforced. You must declare any risk items such as food, plant material, or used outdoor gear, even if you are unsure. Declared items are inspected and often returned quickly, but undeclared risk items can lead to on-the-spot fines and delays, so honesty is always the best approach.
Q7. Can I buy a local SIM card or eSIM on arrival at Auckland Airport?
Yes, mobile providers and electronics retailers have kiosks in the International Terminal arrivals area where you can purchase physical SIM cards or eSIM plans. Staff are used to helping visitors set up mobile data on the spot so you can use maps and messaging before you leave the airport.
Q8. Is it a good idea to drive immediately after arriving on a long-haul flight?
It depends on how you feel, but many first-time visitors underestimate fatigue after long-haul travel and time zone changes. If you are at all unsure, consider staying at an airport hotel or using public transport or a shuttle into the city and collecting your rental car the following day when you are rested.
Q9. Where do I meet the shuttle for my off-airport rental car or campervan?
Off-airport rental companies and campervan brands use a dedicated shuttle transfer zone near the airport precinct, often behind the Te Arikinui Pullman hotel or in clearly marked lanes near the Transport Hub. After exiting arrivals, follow signs for off-site shuttles or check your booking confirmation for exact pick-up instructions.
Q10. What should I do if my international flight is delayed and I miss my domestic connection at Auckland?
If your flights are on one ticket, go straight to your airline’s transfer or customer service desk; they will usually rebook you on the next available flight. If your domestic flight is on a separate ticket, you will need to speak to that airline as a new customer and may have to purchase a new ticket, which is why extra connection time is strongly recommended for self-planned itineraries.